During Qiscus’ yearly webinar, Conversa 1.0, held at the end of the previous quarter, Qiscus launched a new product called Qiscus Robolabs. Qiscus Robolabs is an add-on platform developed by Qiscus which functions as an integrator between the bot engine and Qiscus Multichannel Chat (QMC). This service was developed to help make it more convenient for businesses to create and customize their own chatbots to be integrated automatically with their QMC accounts.
This article will explain the basic steps to help you create a chatbot on your QMC account:
- Create a project on Robolabs
- Integrate projects created in Robolabs with Dialogflow
- Entering Dialogflow account credentials into Qiscus Robolabs
How to Create a Bot Project in Robolabs
To create a bot project in Robolabs, you will need to integrate the bot in Robolabs with the Dialogflow project. Dialogflow is a bot engine owned by Google. Users can create chatbots according to their preferences, beginning from creating agents, intents (representing a mapping between what the user says and the action the user must take), and training phrases.
To create a bot project in Robolabs:
- Go to Robolabs on the sidebar in your Multichannel account menu
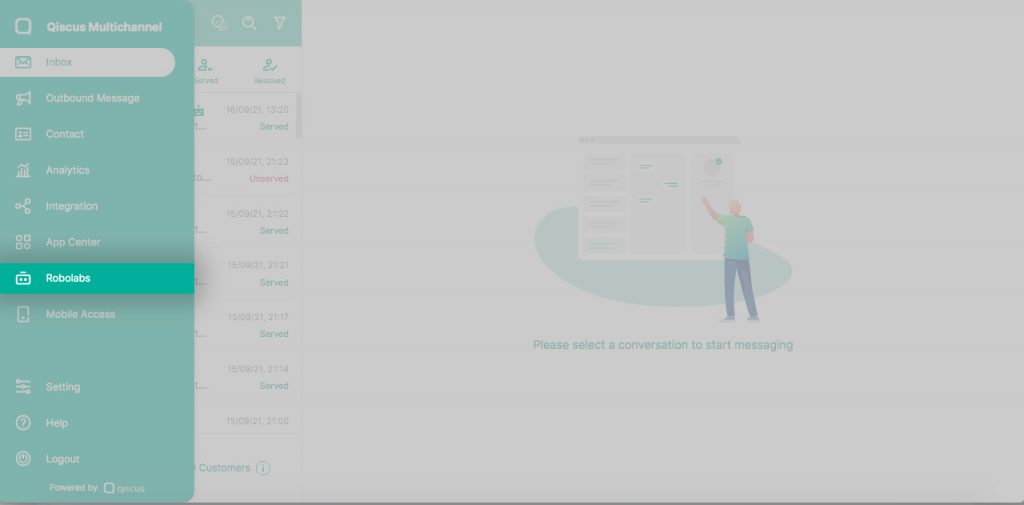
- Select the Bot Integration button located at the top right corner of the Robolabs page.

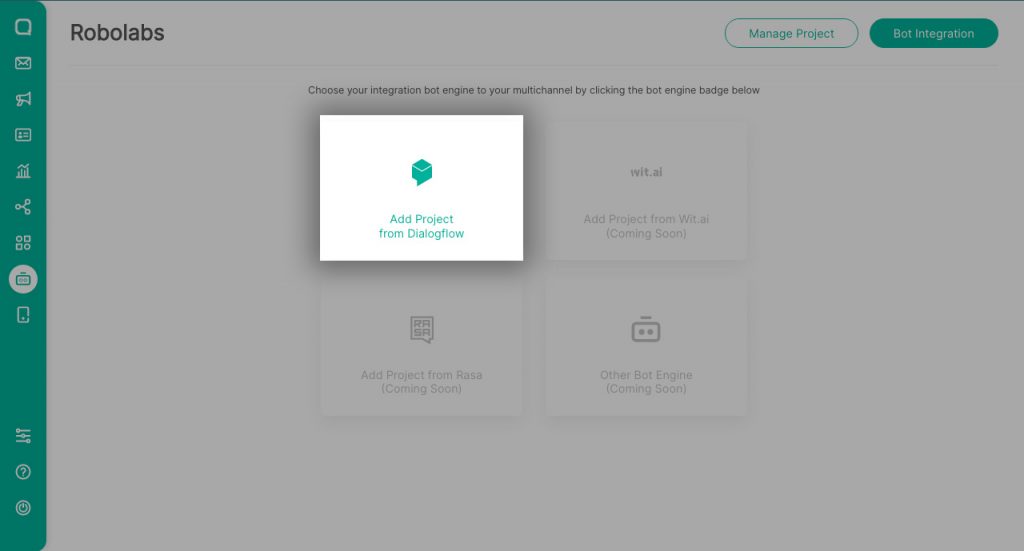
Next, select Add Project from Dialogflow to integrate with Dialogflow
After selecting the integration with Dialogflow, you will set up the bot to be used. The steps are as follows:
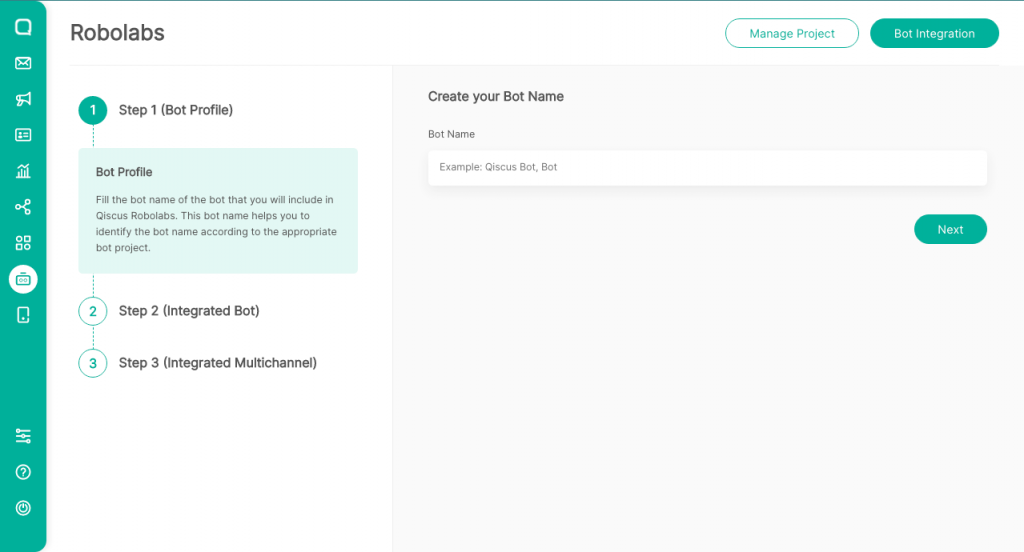
- Write the name of the bot to identify the project. Enter the name of the bot in the Bot Name. column, then select Next
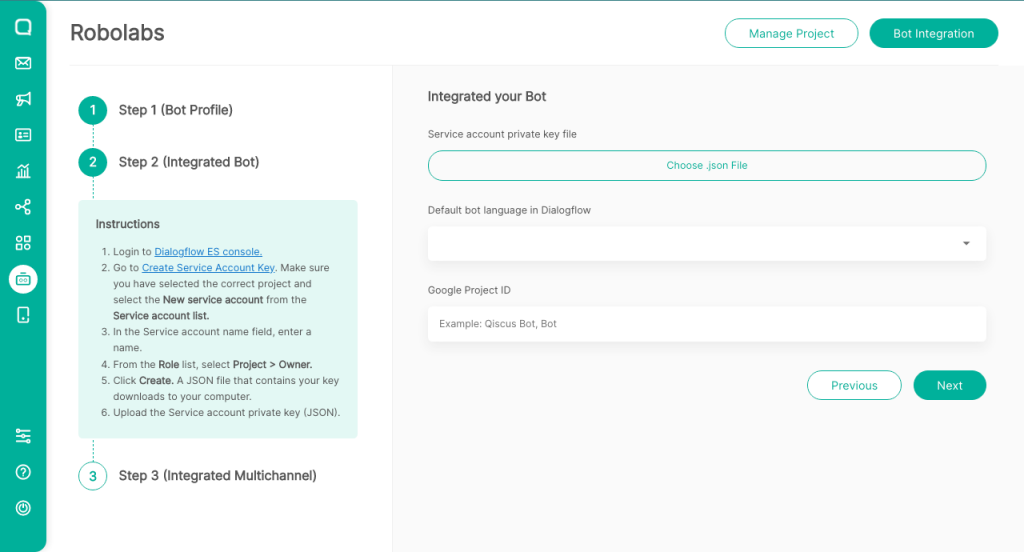
- Next, click Integrate Bot. Here, you will have to integrate with Dialogflow according to the instructions on the page. You are also expected to include some credential items contained in Dialogflow to be included in Robolabs, including:
- Service account private key, in the form of .json file which you must upload here
- Default bot language, the language used to correspond with the bot project in Dialogflow
- Google Project ID according to the bot project in Dialogflow
To source for these items, you must go to the Dialogflow ES page via the following page.
How to Integrate Project Bot in Robolabs with Dialogflow
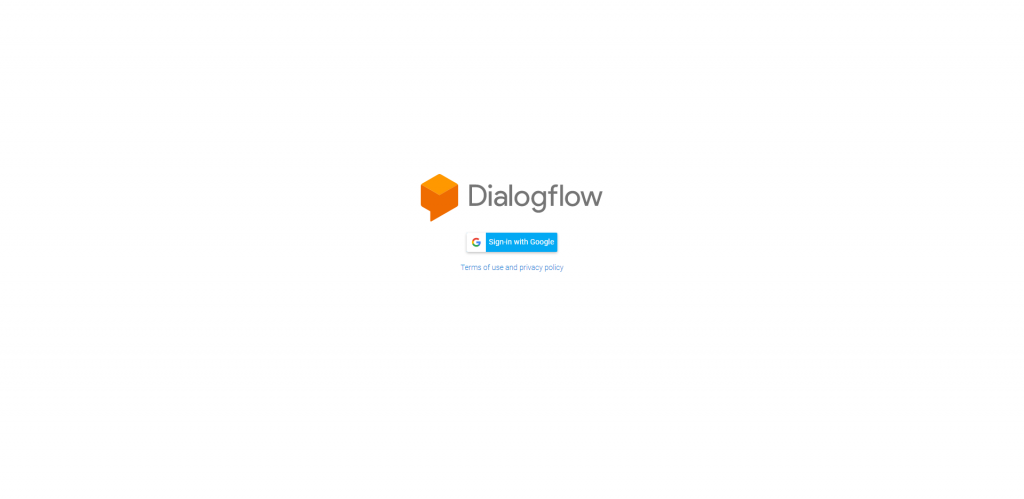
- Go to the Dialogflow ES page, then click Sign-in withGoogle
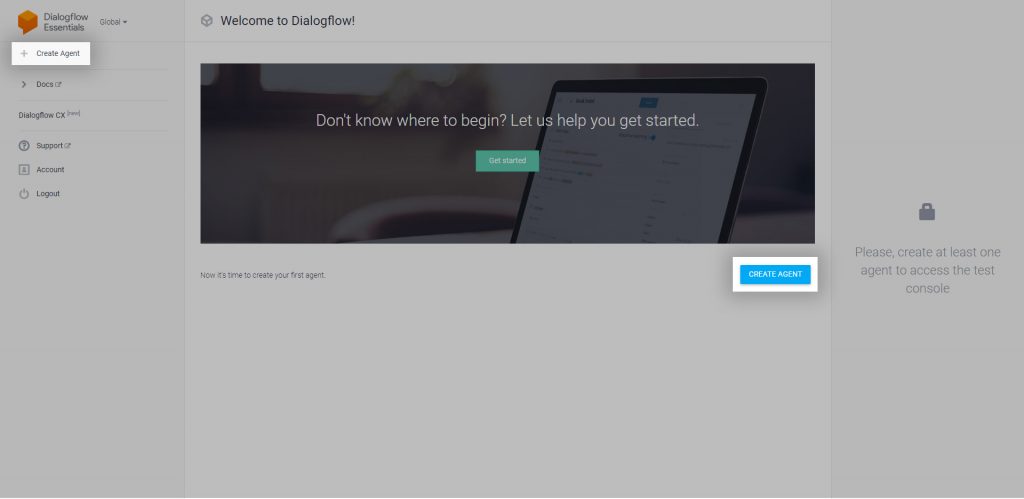
- After entering your Dialogflow ES, the first step is to create a new agent. You can do this by clicking Create Agent on the page.
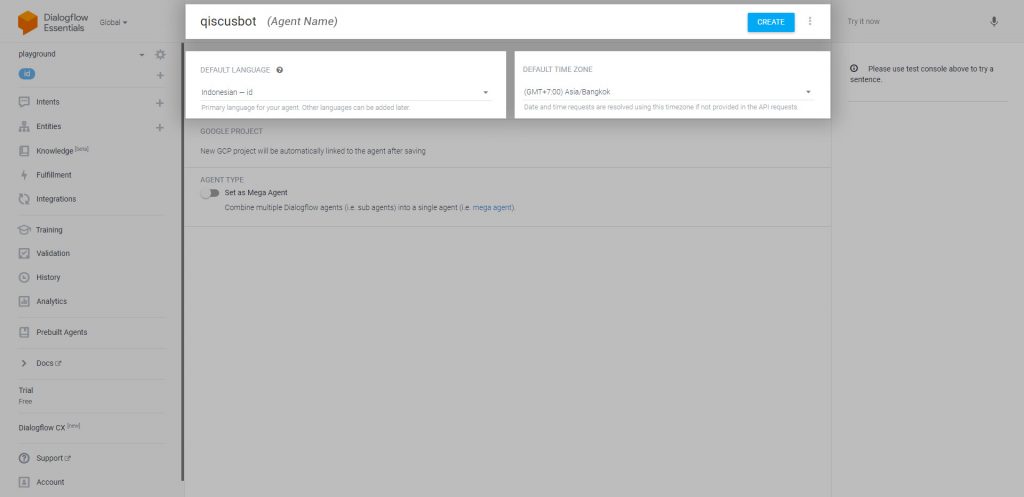
- Next, fill in the Agent Name. You will then need to select the Default Language and Default Time Zone. For example, select the city where the agent “qiscusbot“ is locatedand select Default Language Indonesian -id. Click Create to create the profile.
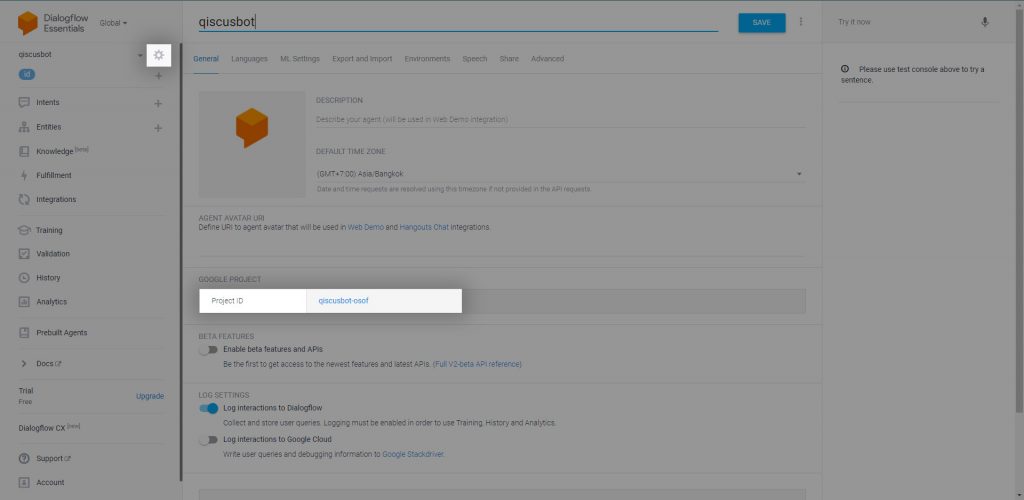
- The bot project has been successfully created in Dialogflow. The next step is to search for the Google Project ID of the project by clicking the Settings button or the ️⚙️ icon on the left sidebar, next to the agent name qiscusbot. Click the icon and you will enter the Settings page. A Google Project ID can be located on that page to be copied and pasted into Qiscus Robolabs. In this example, the Google Project ID is qiscusbot-osof. After that, click the Google Project to receive the Service Account Private Key via the Dialogflow ES console page
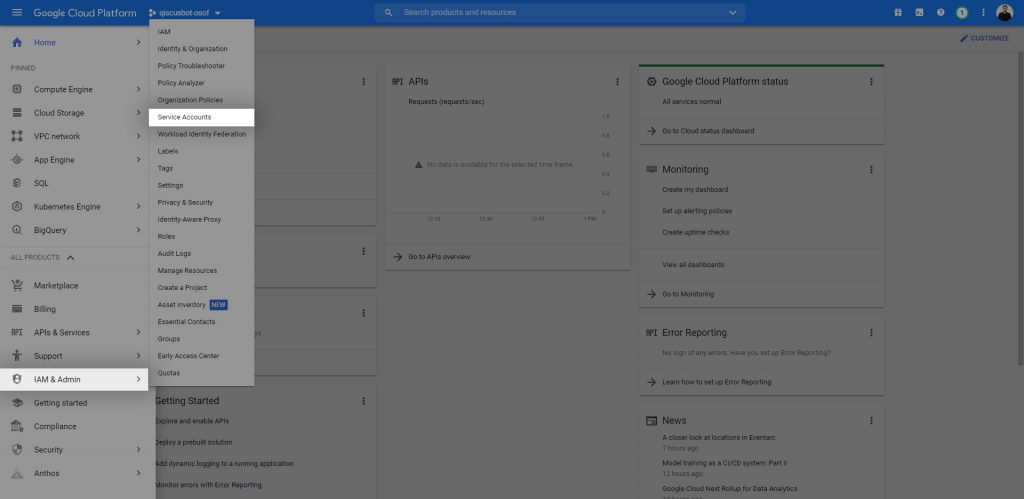
- After entering the Dialogflow ES console page of the Project ID, go to the sidebar. Select IAM & Admin, then select Service Accounts
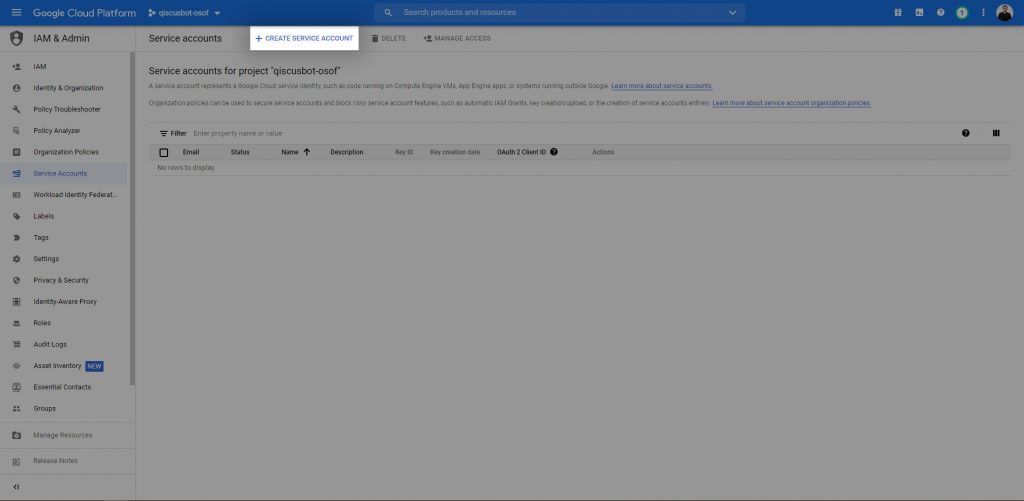
- After that, select + CREATE SERVICE ACCOUNT on the page
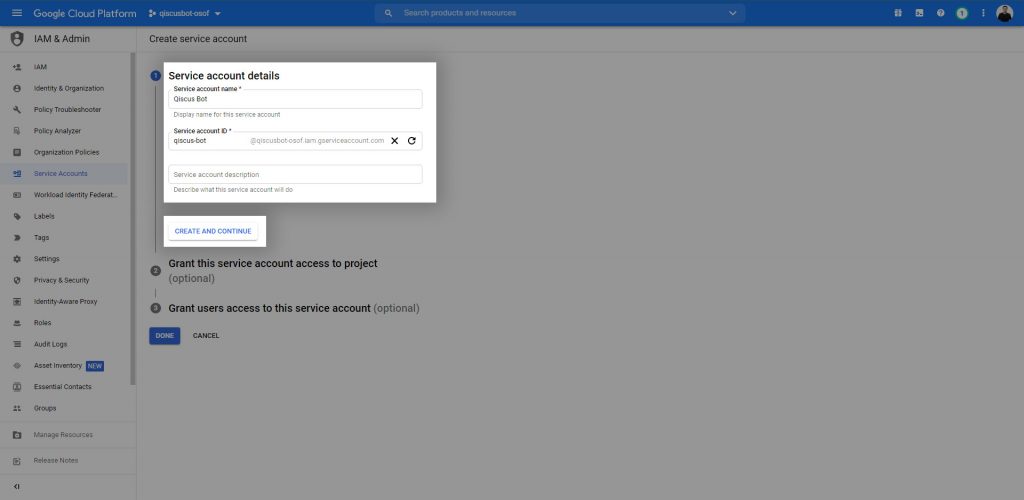
- After entering the Create Service Account page, enter the Service Account Name according to the project name. Here is an example: we enter the name Qiscus Bot. Then, click CREATE AND CONTINUE
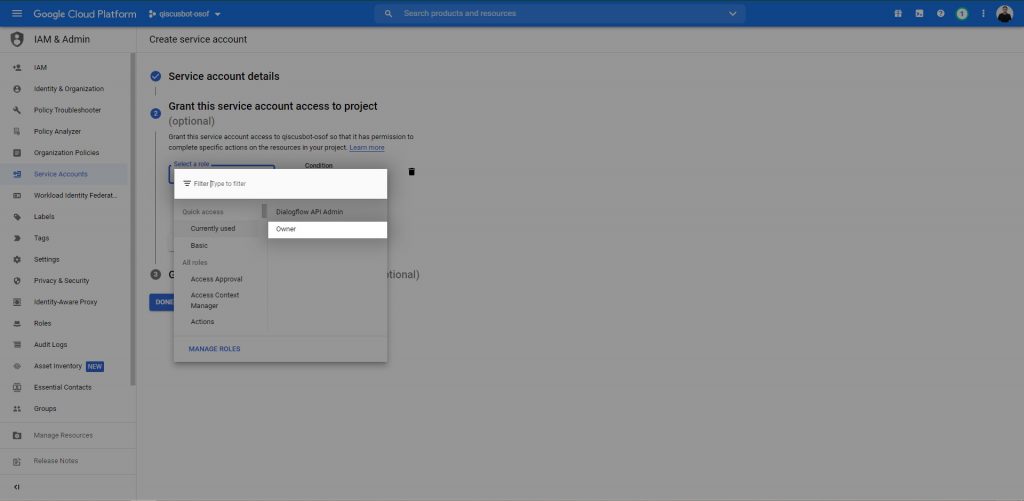
- In the second step, click on Select a role, then click Search or select Owner to determine the role access to the project. Click, then set the task as Done
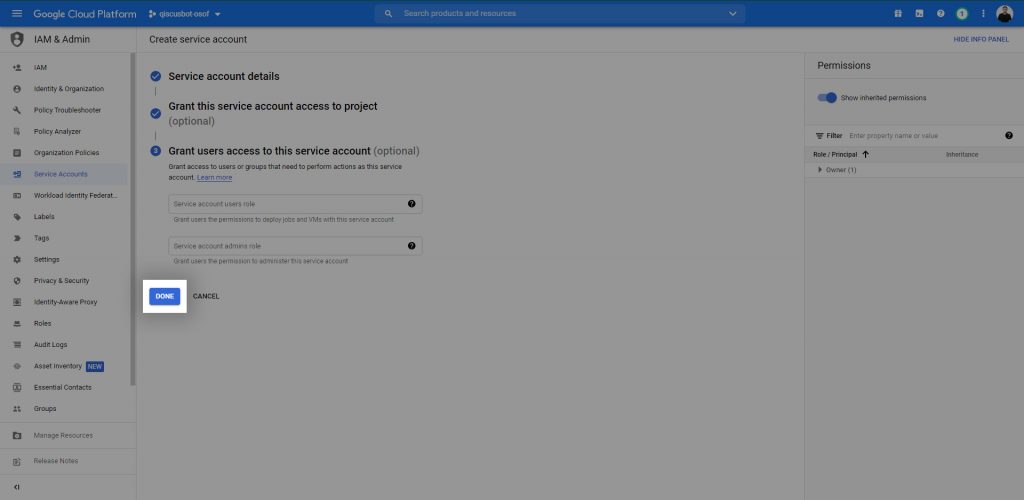
- In the last step for this service account, leave the user role blank (optional), then click Done
- In this step, the service account has been created in the qiscusbot-osof project. The next step is to download the JSON file in the project
- Select the email address for the project whose service key has been created on this page. In the example here, click email [email protected] to go to the service account page

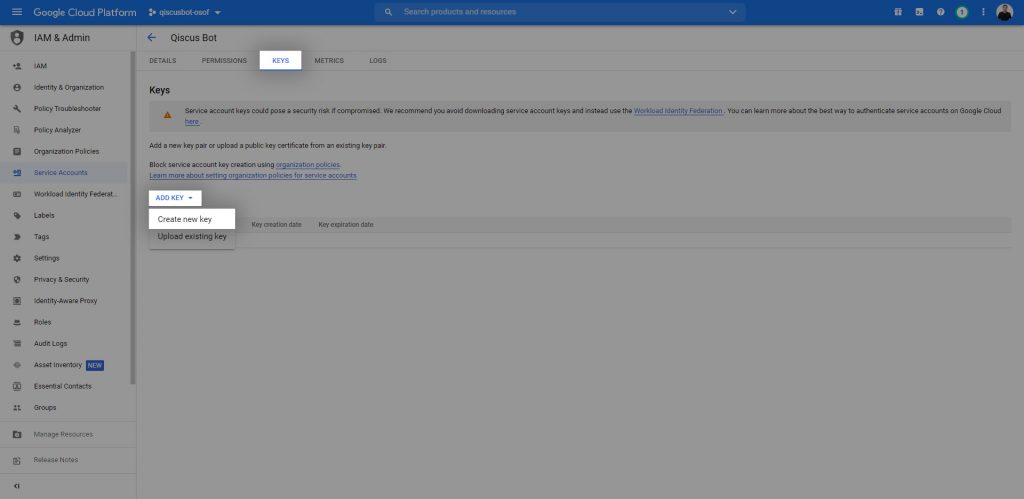
- On that page, select the KEYSmenu. Then click ADD KEY, and select Create New Key
- A pop-up will appear like this, then select key type in the form of JSON. Click Create for the service key to be downloaded to your computer. Once the service key has been downloaded successfully, the last step is to enter the file into Qiscus Robolabs
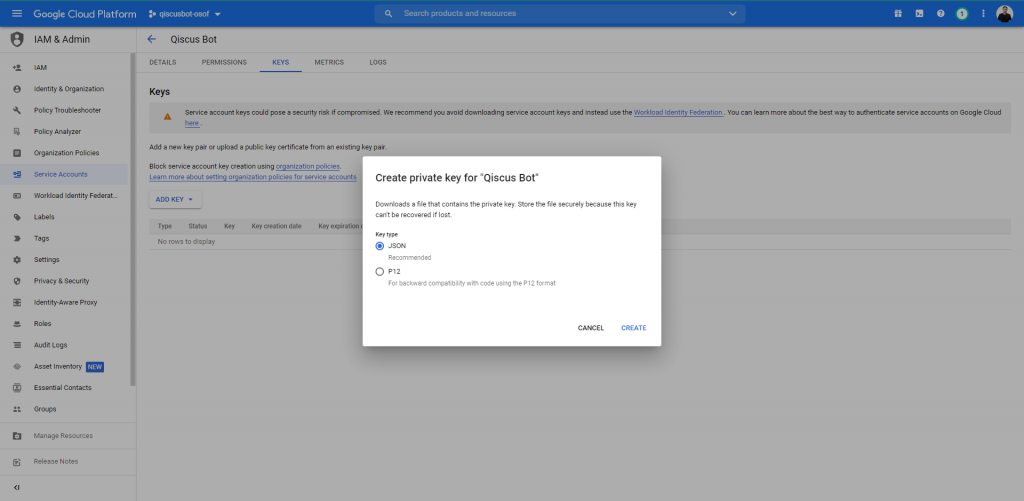
“Note: This service key can only be downloaded once. Make sure the JSON file is not lost. If it is missing, then you will have to create a new service key”
How to Enter Dialogflow Account Credentials to Qiscus Robolabs
After obtaining the Google Project ID, Default Bot Language, and Service Account Key in Dialogflow, you can return to the Integrate Bot page on Qiscus Robolabs. Enter the item in Robolabs according to the project that has been created in Dialogflow. In this example, we have implemented the project ID qiscusbot-osof in Qiscus Robolabs. Then, click Next

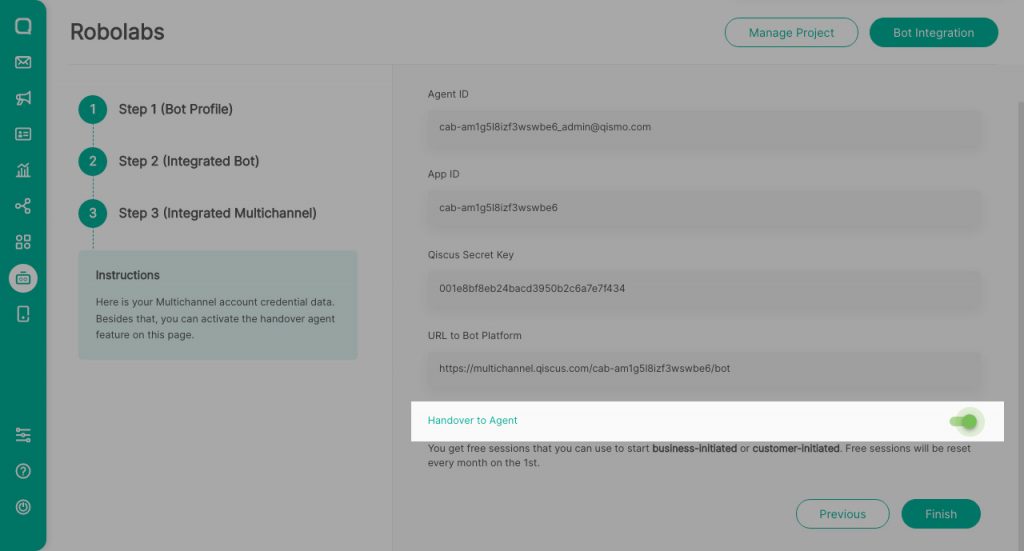
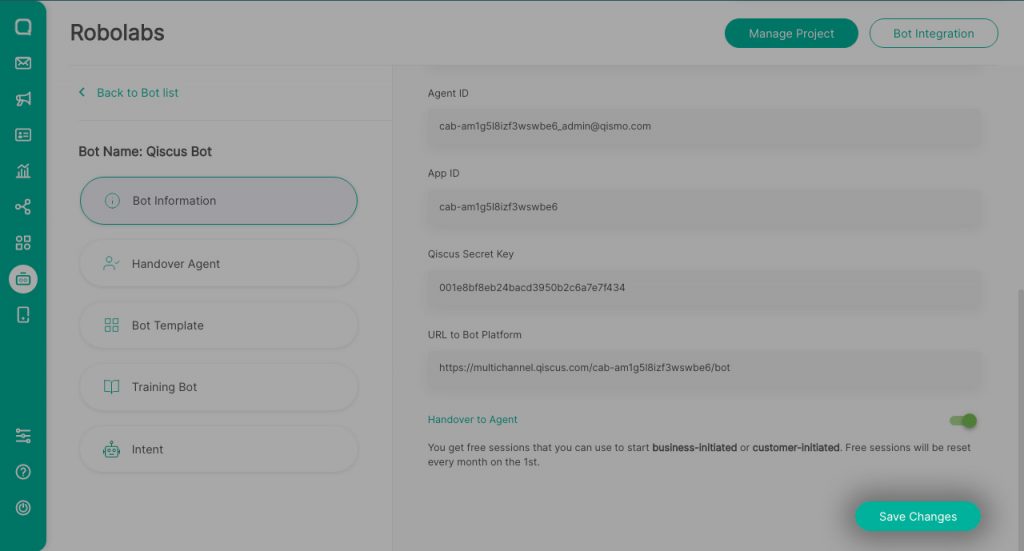
After that, you will return to the third page to Integrate Multichannel. Here, you do not need to change the settings contained in Multichannel because it is automatically integrated. Also, if you want to activate the Handover to Agent feature, you must change the position of the toggle contained in the feature on this page to activate it. Then, click Finish
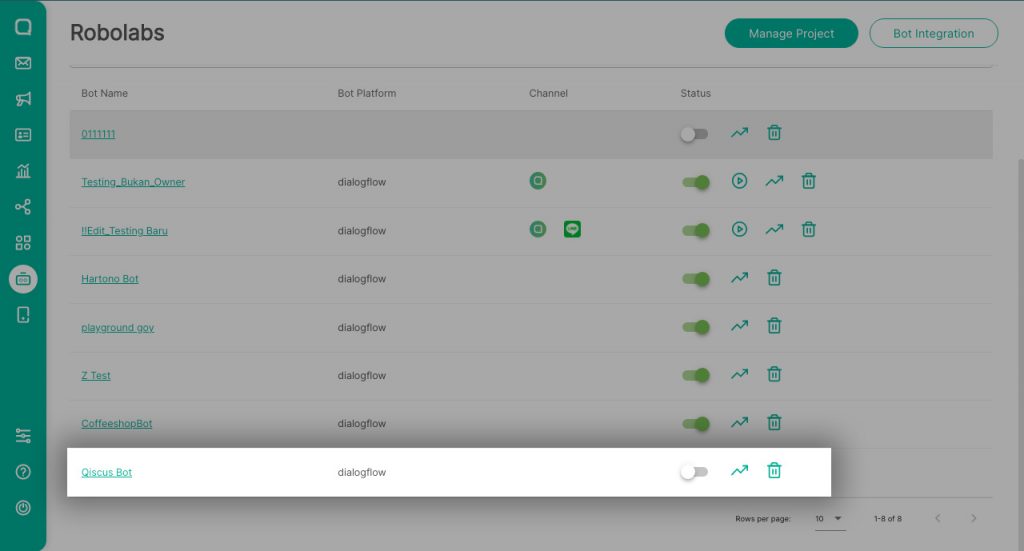
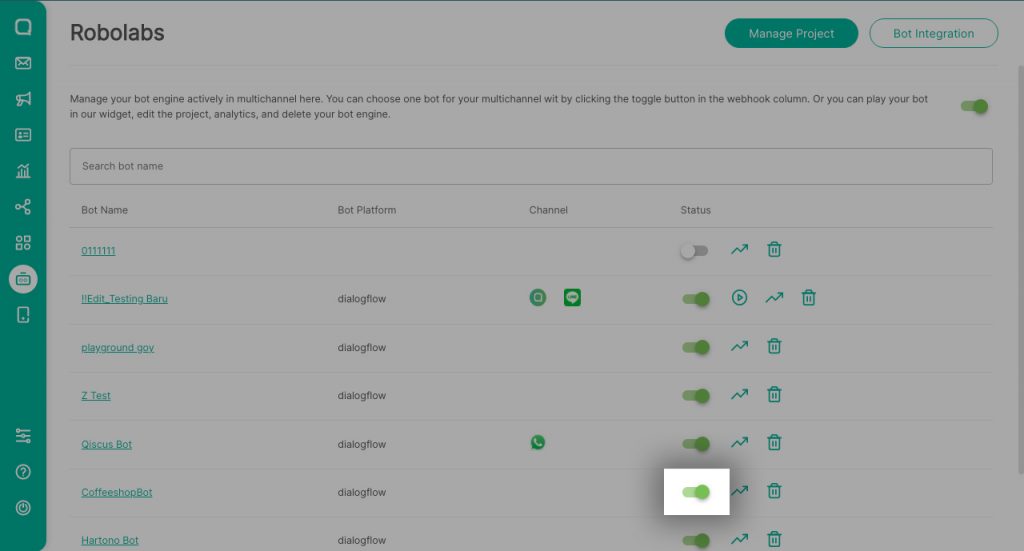
Next, you will enter the Manage Project page. To ensure that the bot has been successfully integrated with Dialogflow, you should see the bot name on this page.
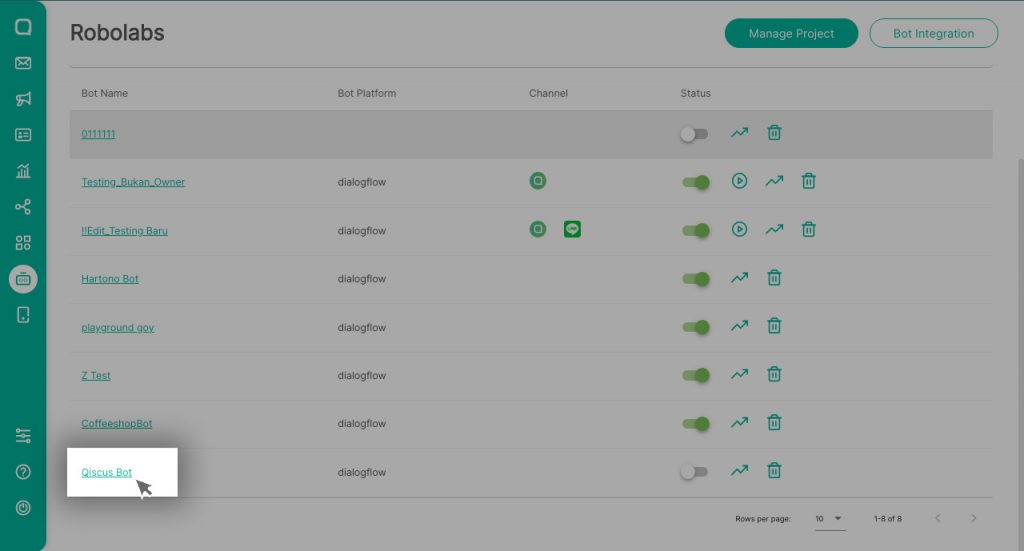
Your bot is now successfully created. The next step is for you to assign the project bot to a channel it will enter. Click the bot name in the project to enter the Bot Information page.
In the Bot Information page, select the Assigned Bot to to select the channel set in your Multichannel account.
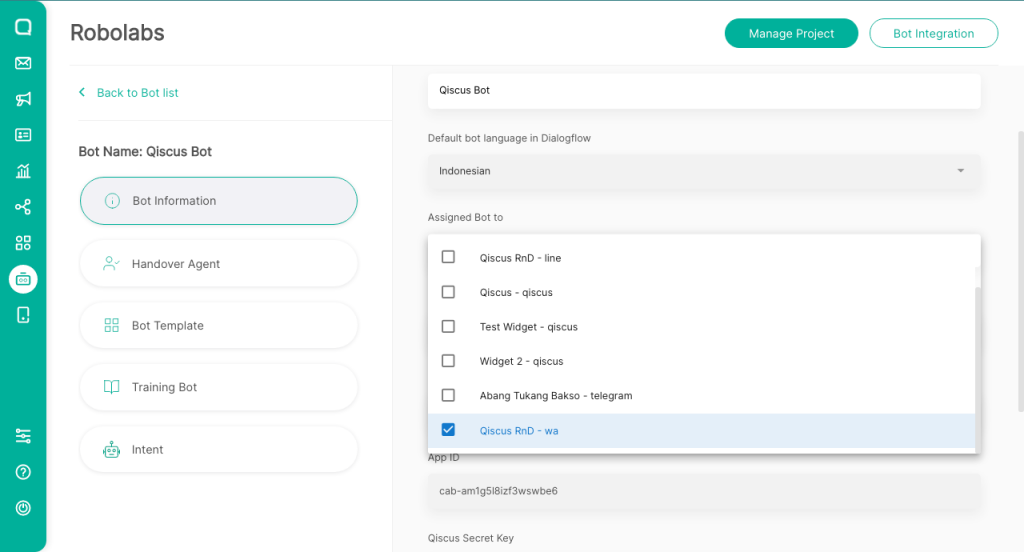
Next, select Save Changes.
After that, return to the Manage Project page to activate the project bot by activating the toggle located next to the bot name in the Status column.
Congratulations! Your bot has been successfully created and integrated with the Dialogflow and your Multichannel account.
Create Your Own Chatbot Now!
By following the three steps above, you can now easily create a Chatbot according to your needs on Qiscus Robolabs and integrate it directly into your business Qiscus Multichannel Chat account. If you experience any problems or want to ask questions regarding the steps above, don’t hesitate to contact our team via this support page Qiscus.