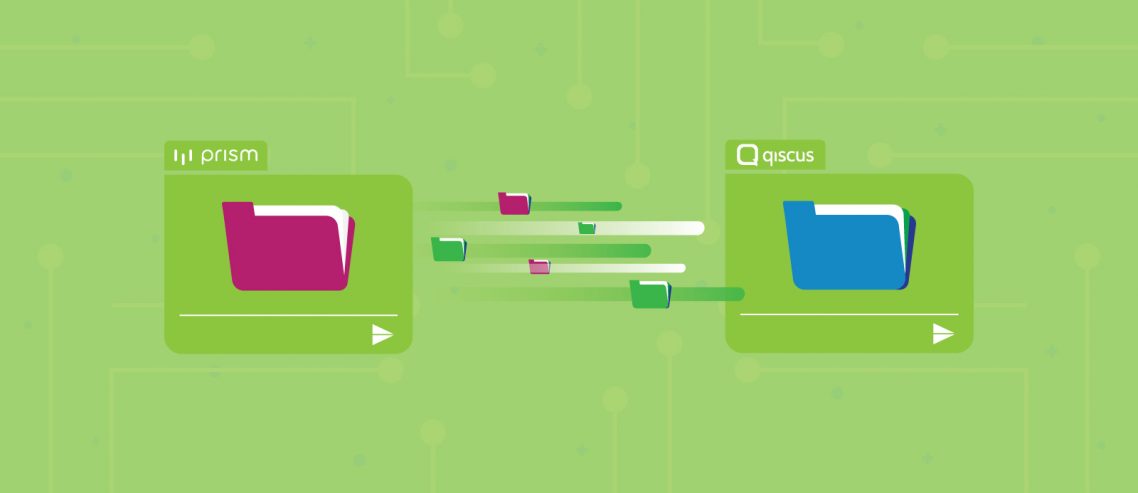
PRISM has announced that it will stop its service to the merchants at the end of April 2019. We welcome you to migrate your multichannel customer service solution to our service.
Qiscus Multichannel Customer Service Chat is a multichannel customer service solution that connects customers to merchants through public messaging service, such as Facebook Messenger, Line, WhatsApp, Telegram, and surely Qiscus widget. This allows merchants to gather all incoming messages from the customers in one place and reply back to them in a short time.
There are several features that Qiscus Multichannel Customer Service Chat provides to support customer service. The first feature is messaging services integration that is connected to the aforementioned channels. Second, it has an agent management feature that will help you in distributing your agents to handle the incoming messages as well as in monitoring your agents’ performance. Furthermore, the chatbot integration feature is also provided to help you automate your relationships with the customers.
PRISM and Qiscus Multichannel Customer Service Chat have a similar main feature, which is message service integration. You can adjust the following settings when you use Qiscus Multichannel Customer Service Chat.
Getting Started
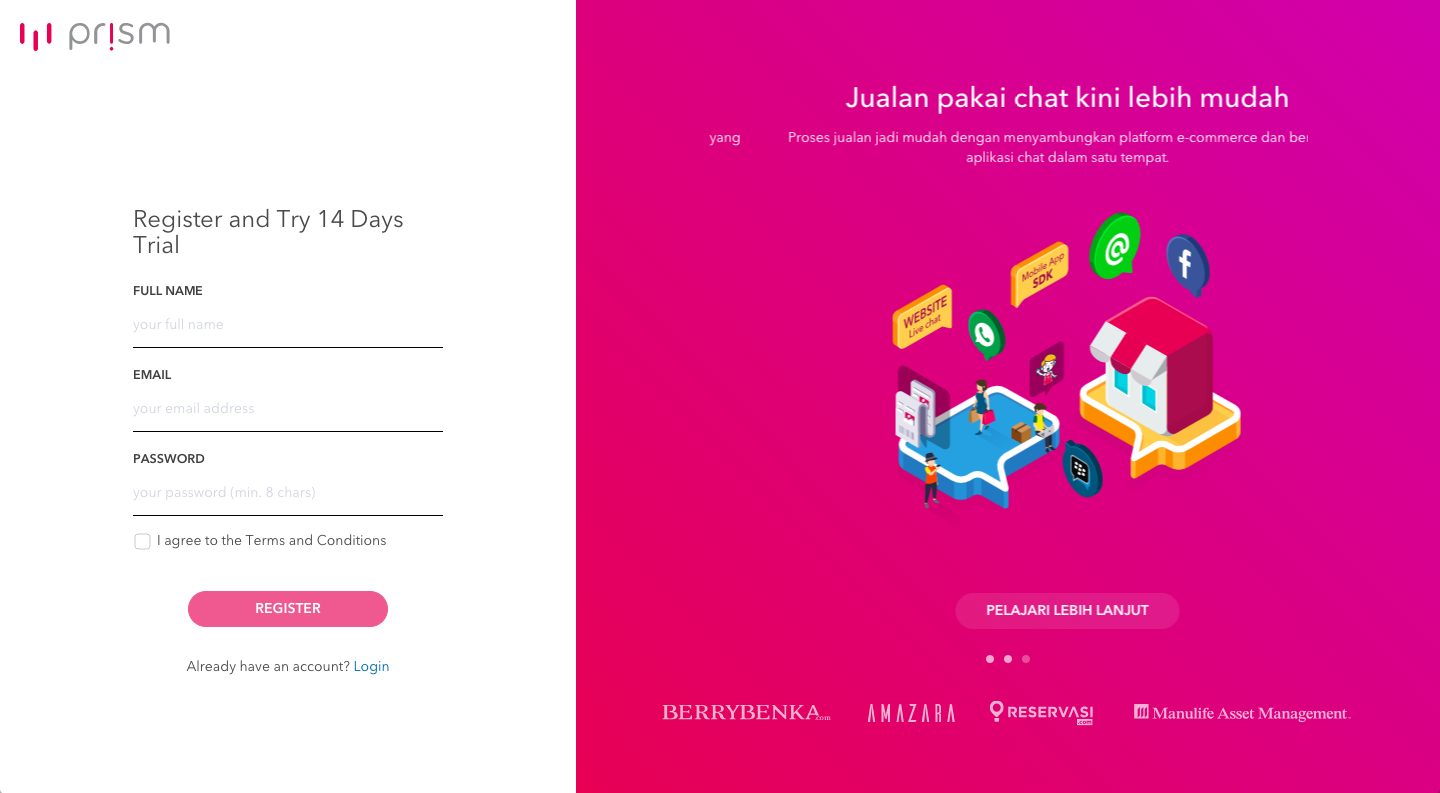
First, to use PRISM and Qiscus Multichannel Customer Service Chat, you need to register. The flow of registration is almost identical. Register to PRISM through this link. Fill the form as pictured below. Then, verify the email and log in.
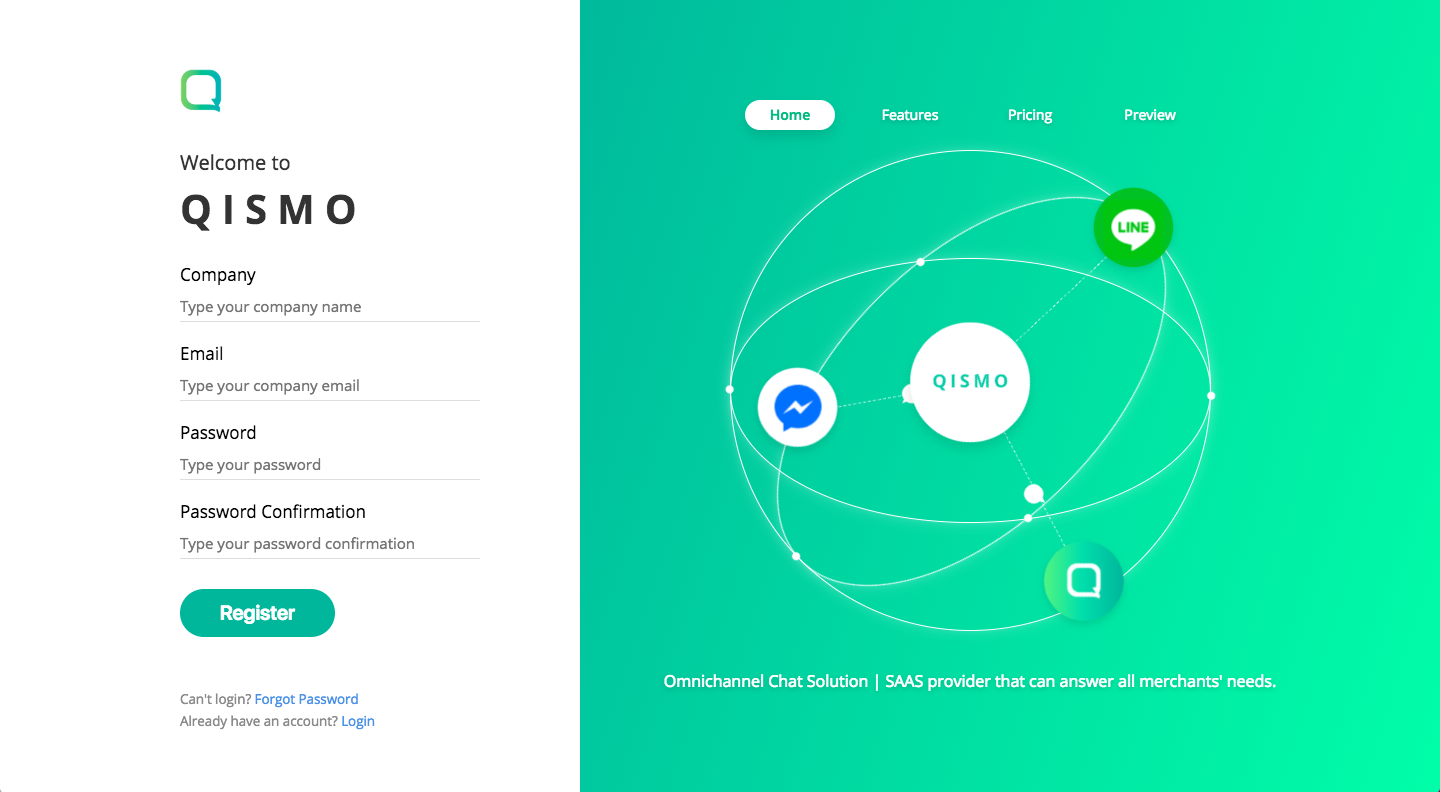
Register to Qiscus Multichannel Customer Service Chat at this page. Fill the form as pictured below. Then, verify the email and log in.
Channel Settings
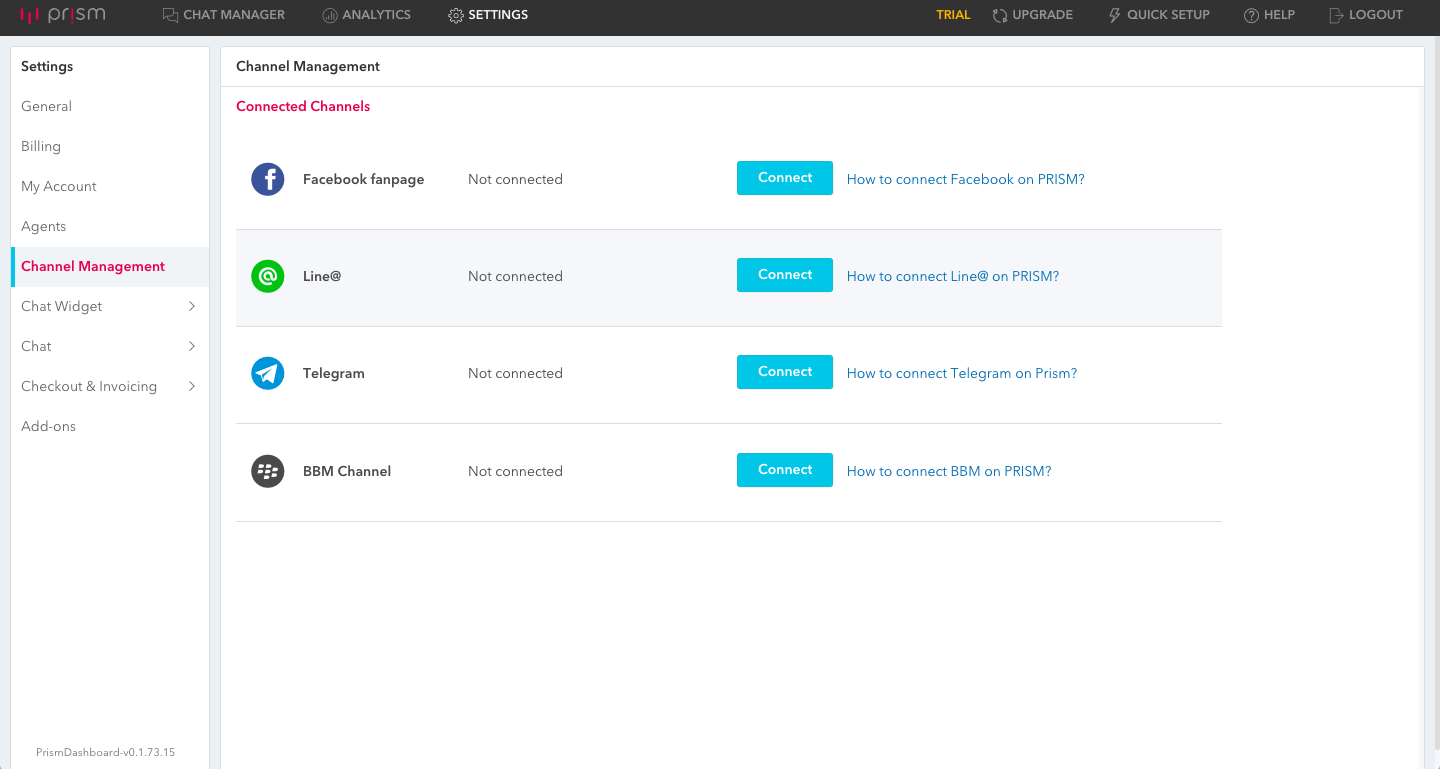
PRISM and Qiscus Multichannel Customer Service Chat can connect to multiple channels. PRISM can connect to Facebook Messenger, Line, Telegram, BBM, and PRISM widget. On the other hand, Qiscus Multichannel Customer Service Chat can connect to Facebook Messenger, Line, WhatsApp, Telegram, and Qiscus widget.
You can set the channels in PRISM by going to Settings and then Channel Management. On this page, you can connect to the channels you prefer.
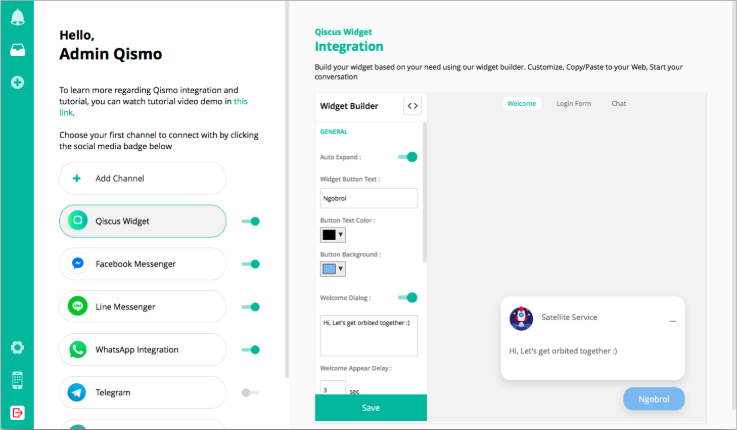
On the other hand, you can set the channels in Qiscus Multichannel Customer Service Chat by clicking the “+” button at the left side to access the Integration page. On this page too, you can connect to the channels that you prefer.
Qiscus Channel
Qiscus channel is Qiscus official channel that allows you to integrate your customer engagement in a form of a web widget. To adjust the widget view with your site, Qiscus has provided a GUI (Graphical User Interface), that we call as a widget builder. This will help you to set a few things such as the welcome message, the widget’s name and avatar, the button texts, and many more.
By default, the widget only shows you an overview to be inserted to the website. However, this is not limited to web only. You can insert the widget in your Android, or even iOS, application. For further info on how to install this widget in Android, please open the Android in App Widget section.
Facebook Messenger
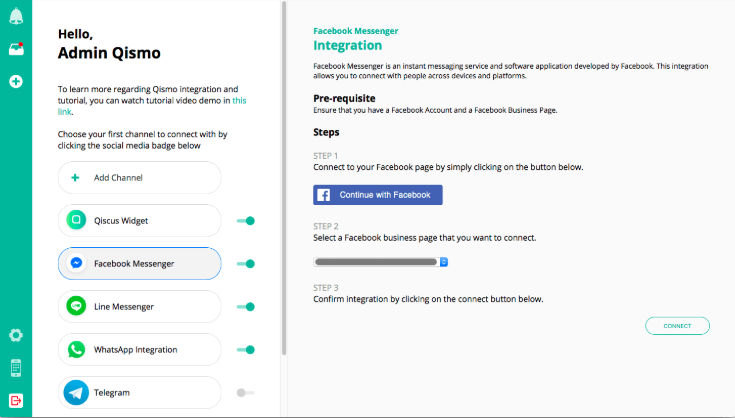
Channel integration allows you to connect to the customers through various devices and platforms using the Facebook Messenger application. To connect to Qiscus, the first thing you need to ensure is that you already have a Facebook account and a Facebook Page. After that, follow these instructions to connect:
- Connect your Facebook by clicking the Continue with Facebook button
- Choose the Facebook Page you want to connect with.
- Lastly, confirm the integration by clicking the Connect button.
Line
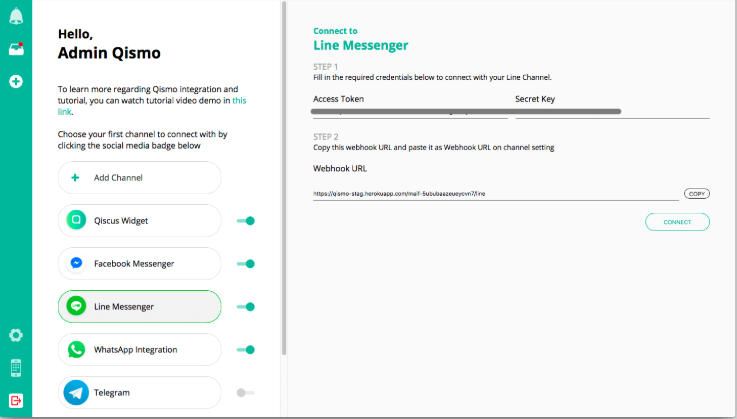
For integration with Line, currently Qiscus only supports API Messaging with a Developer plan. Therefore, make sure you have chosen the correct plan.
To connect the service, you need to configure several things in Line console, which are:
- First, generate the Channel Secret and save for later use in Qiscus settings.
- Scroll to message settings and generate the Channel access token Line app, and save this token.
- Make sure you have activated Use webhooks.
- Make sure you have activated Allow bot to join group chats.
- You may also want to deactivate the auto-reply and greeting messages features.
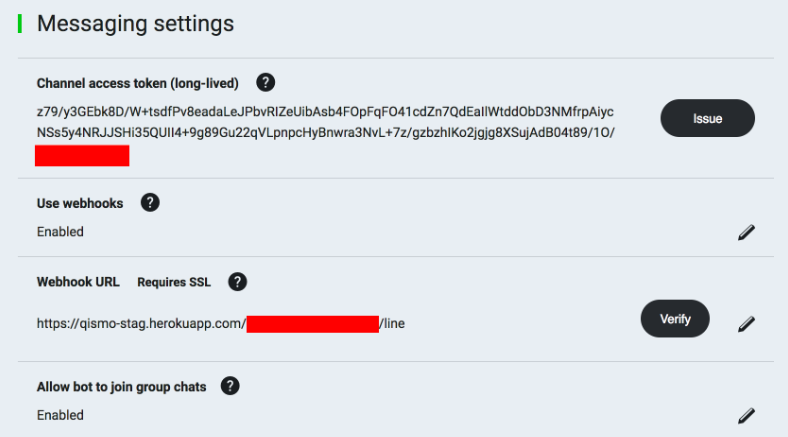
After you’re done with Line console, access the integration page of Qiscus for Line and fill in the two basic information that you want to get from the Line console, which are:
- Channel access token
- Channel secret
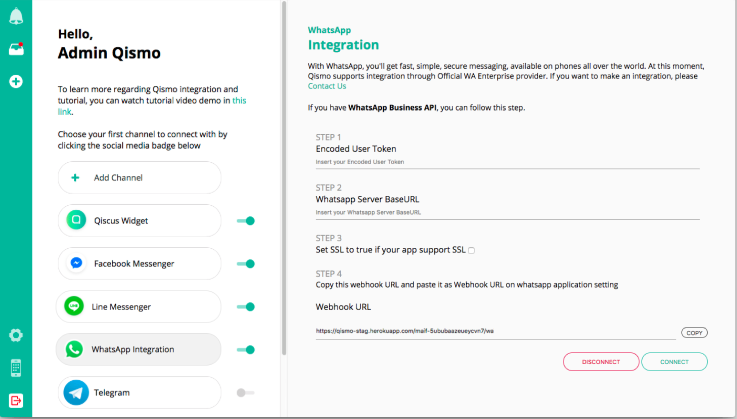
Whatsapp integration allows you to connect to your customers through Whatsapp application. For Whatsapp integration, you need to have Whatsapp Bussiness API. Nevertheless, if you haven’t gotten the WhatsApp Business API and want to start the integration, worry not and please Contact Us. Currently, Qiscus is supporting Whatsapp integration through several Official Whatsapp Enterprise provider.
If you have the WhatsApp Business API, you can follow these instructions:
- Enter the Encoded User Token. Learn more at https://developers.facebook.com/docs/whatsapp/api/users/login#request.
- Enter the Whatsapp Server BaseURL.
- If you already have an installed SSL certificate in the Whatsapp API, mark with a check in the checkboxes under “Set SSL to true if your app support SSL”.
- Install the Webhook Qiscus Multichannel Customer Service Chat in the app settings of Whatsapp API.
Telegram
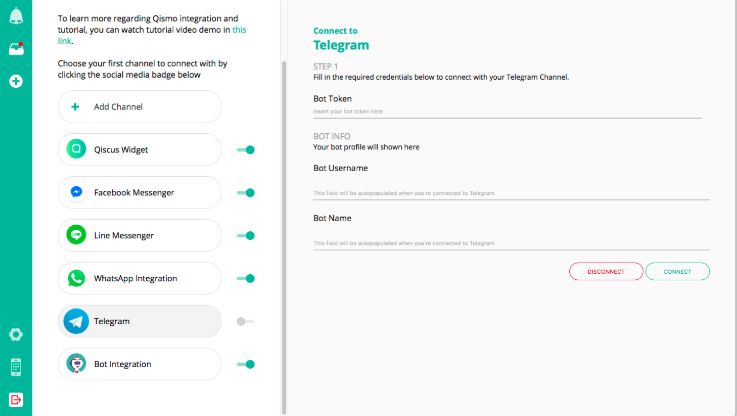
It is quite easy to connect Telegram with Qiscus Multichannel Customer Service Chat. You will only need to fill a Telegram access token form in Qiscus’ integration page for Telegram.
- Make a bot in Telegram by requesting to BotFather. Just answer its questions and you will get the token.
- Copy the token and paste it at the Bot Token on Qiscus’ integration page for Telegram. Qiscus Multichannel Customer Service Chat will automatically generate the Bot Username and Bot Name.
Custom Channel
Besides those five channels, you can integrate any service you want as long as it’s about exchanging texts, or as we call it, custom channel. For example, if you want to allow interaction through SMS, you can do that by entering your own webhook URL in the custom channel. You are providing your own server to be connected to Qiscus every time you want to send any message through Qiscus to your custom channel, and vice versa.
Learn more about Channel Integration here.
Agent Settings
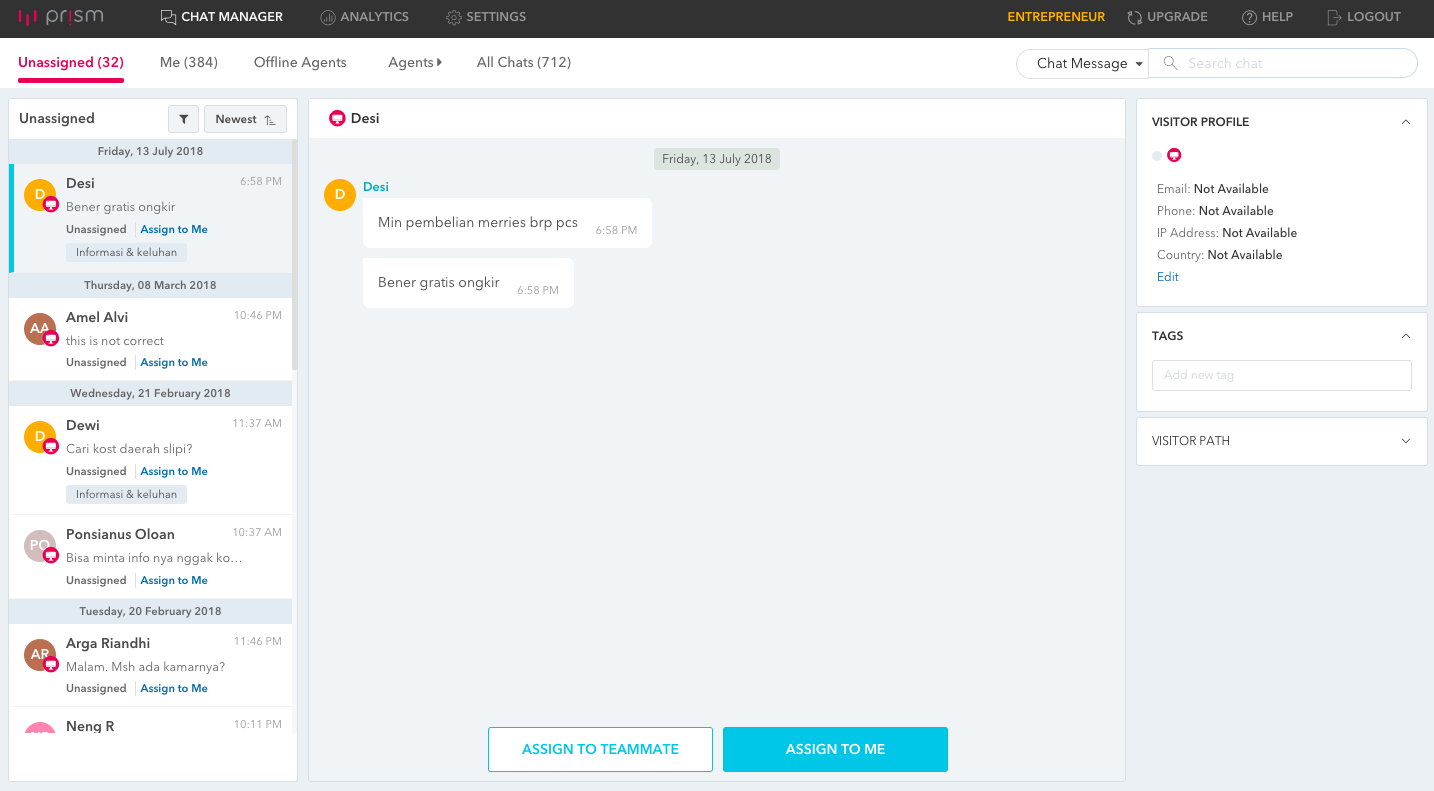
Both PRISM and Qiscus Multichannel Customer Service Chat have agents that assist the customers. To manage the agent settings in PRISM, you can go to Settings and then choose Agents. On this page, you can add agents, change an agent’s data, and deactivate agents. On PRISM, there are three roles: Owner, Admin, and Staff. The Agent page is only accessible for the Admin and Owner.

The agent settings in Qiscus Multichannel Customer Service Chat can be found by clicking the “Settings” button on the left side, and then choose Agents Management. On this page you can add agents, change an agent’s data, delete agents, find agents using their names, and seeing the agent’s analytics and role management.

Create or Edit Agent
To add an agent, click the +Add New Agent button, and an agent data form will pop up. The fields that are required to fill are the agent’s name, email, password, role, and assigned channel. To change the data of each agent, click the Edit button, and edit the info as desired. After that, save the changes by clicking the Save button.

Agent Login
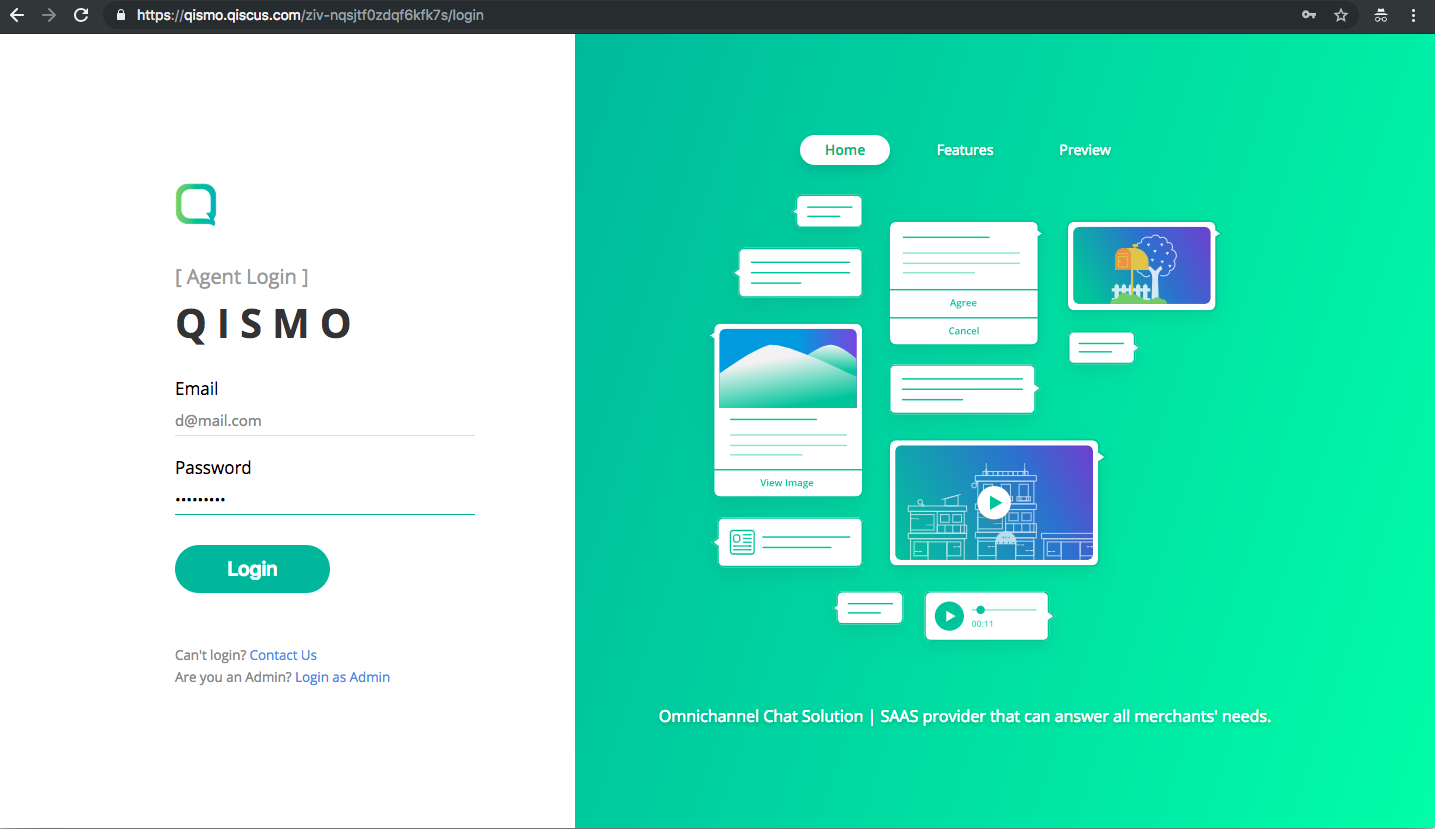
Logging in as an agent is slightly different from logging in as an admin. There is a separate URL that an agent needs to access to log in. This URL can be obtained from the Agent Management page. The following are the steps to log in as an agent.
- The admin copies the Agent login link on the Agent Management page for the agents to log in.
- The admin gives the link to the agent.
- The agent accesses the link and is redirected to the agent login page.
- The agent enters their email and password. If successful, the agent will be taken to the inbox page.
Analytics
You can see the agent analytics data in the Analytics section. With this analytic data, you can see the total number of conversations as well as the ongoing and resolved ones, both in overall and for each agent.
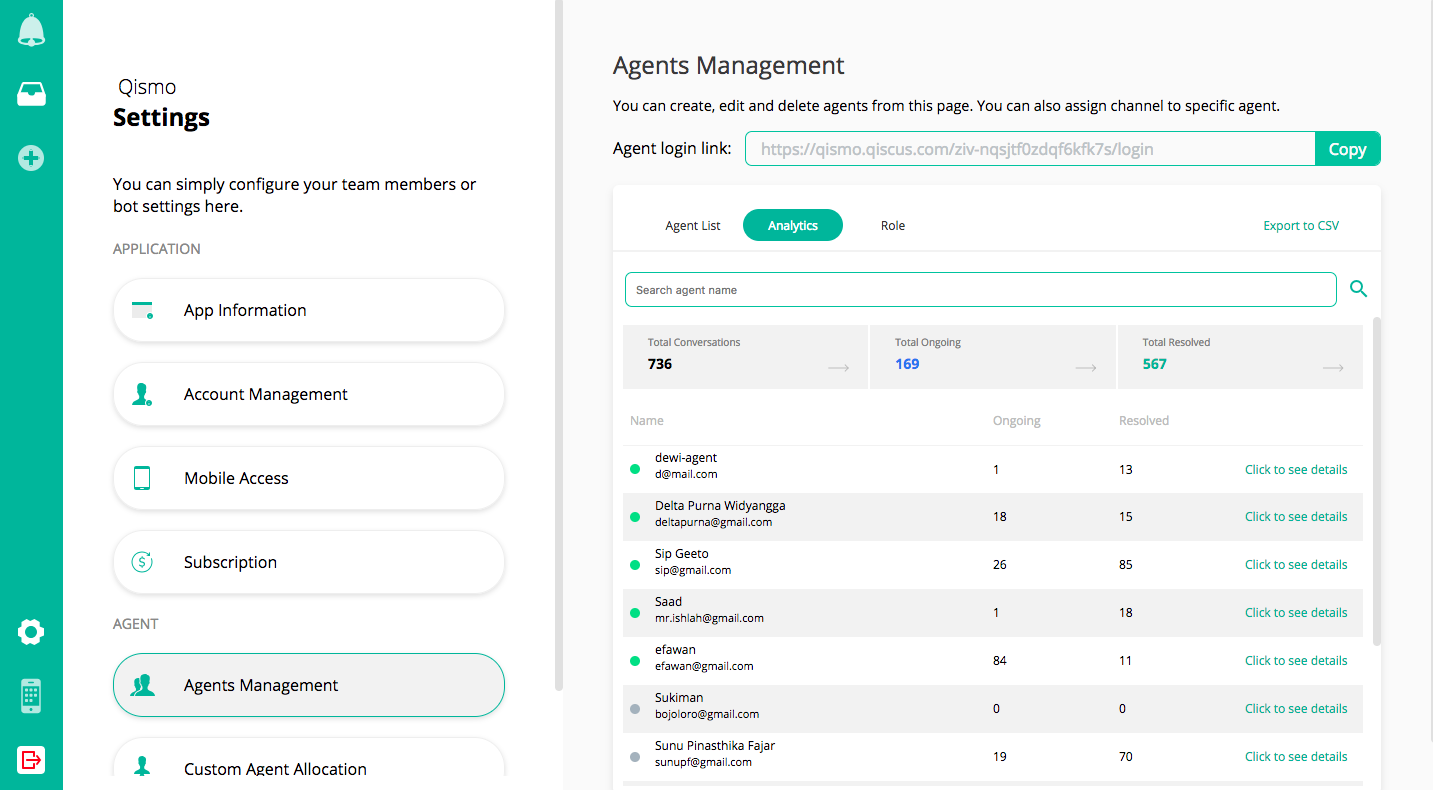
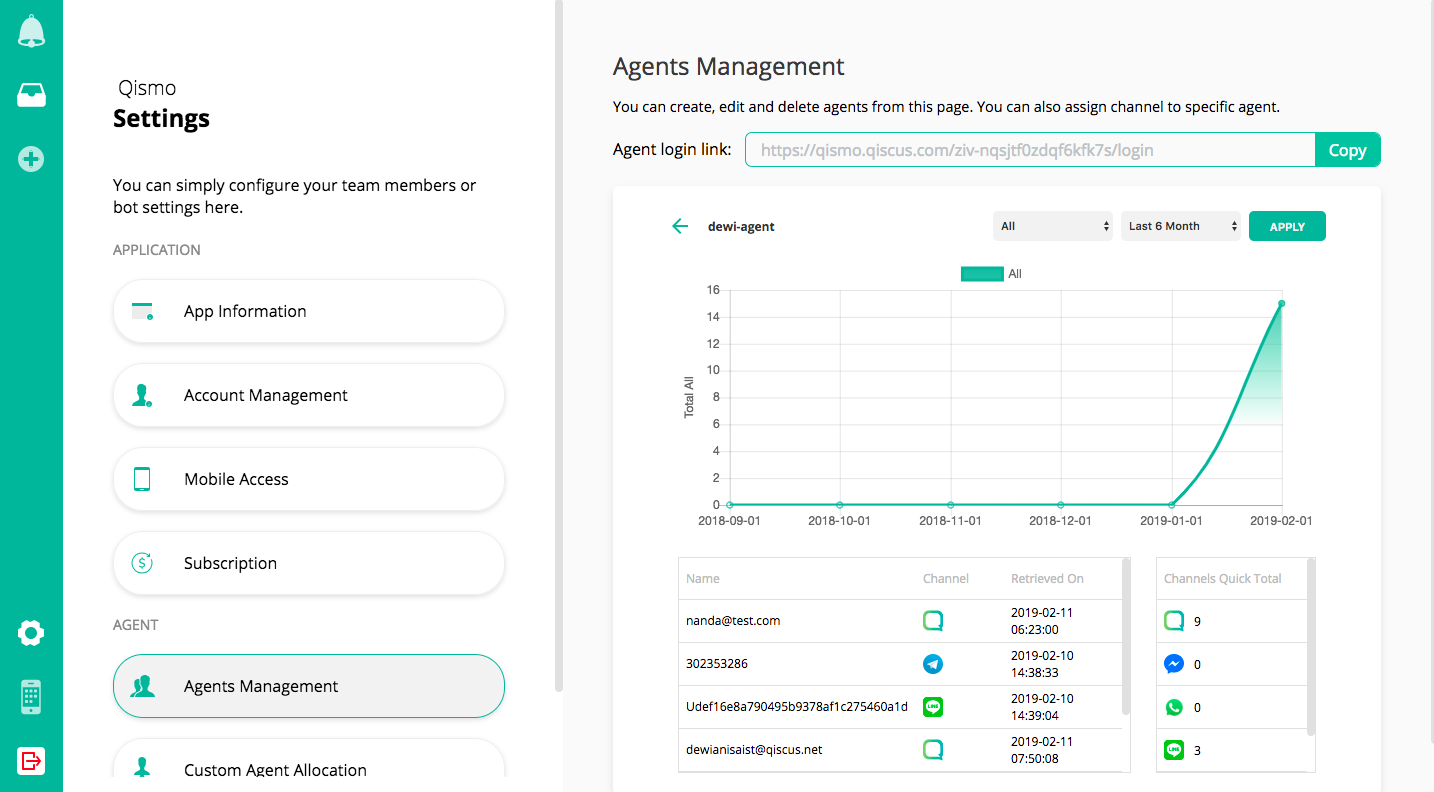
The details of each agent’s analytic data can be accessed by clicking the Click to see details button. On the detail page, you can see which customers have been assisted, both the resolved and ongoing ones, and from which channels they come from.
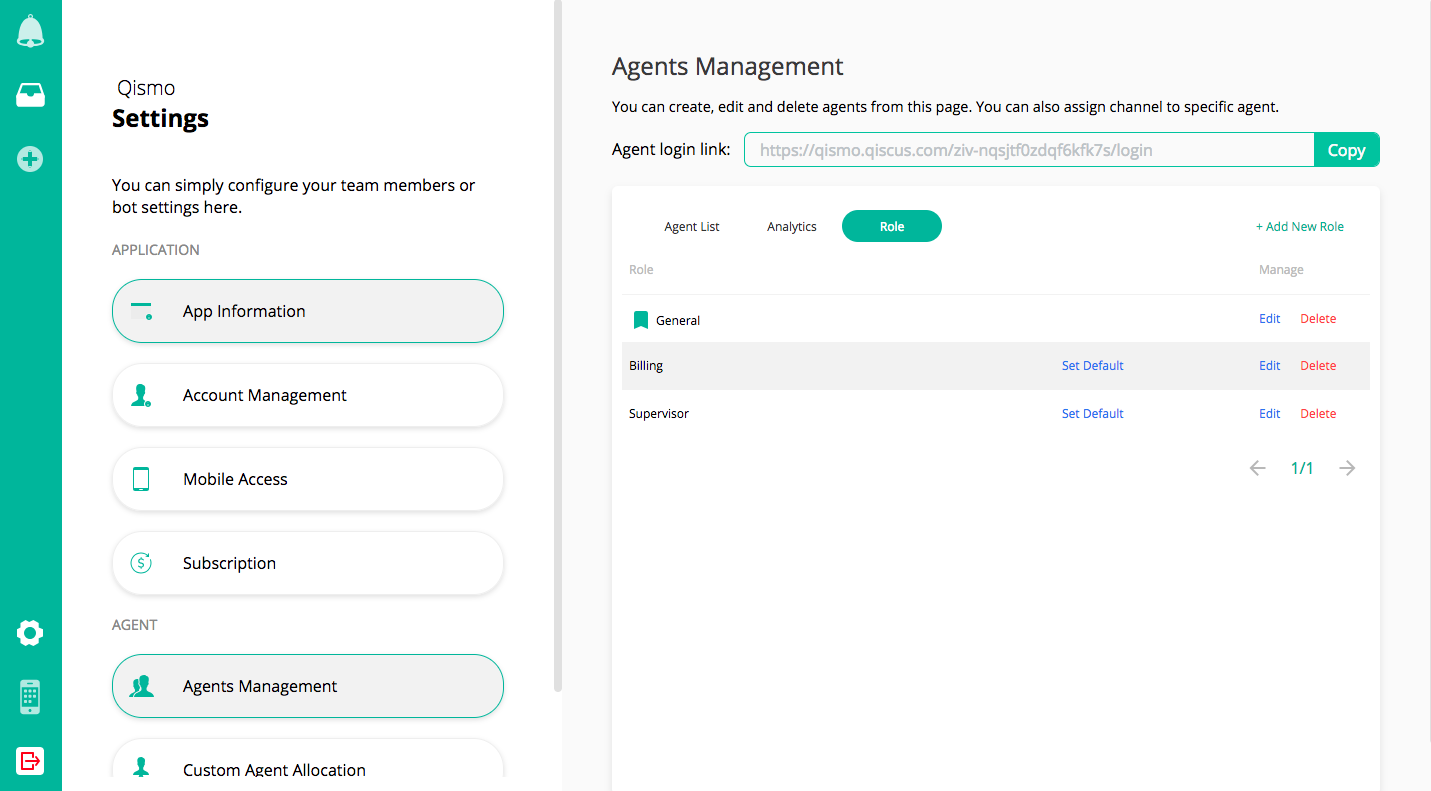
Role
The role is currently only used to handover the bot to certain roles. You can add, edit, delete, and set the default role by accessing the Role section in the Agents Management page.
Managing Messages
After you connect your PRISM and Qiscus Multichannel Customer Service Chat account to any desired channel, you are ready to manage the incoming messages in the dashboard page. All messages from any channel will be gathered in one place.
PRISM gathers all incoming messages to the Chat Manager. By default, all incoming messages do not have an assigned agent. Every incoming message that will be handled by an agent must be assigned to the agent themselves or to another agent. When the conversation is finished, the agent can close the conversation. All messages will have a badge from their respective channel (Facebook Messenger, Line, Telegram, BBM, and PRISM widget).
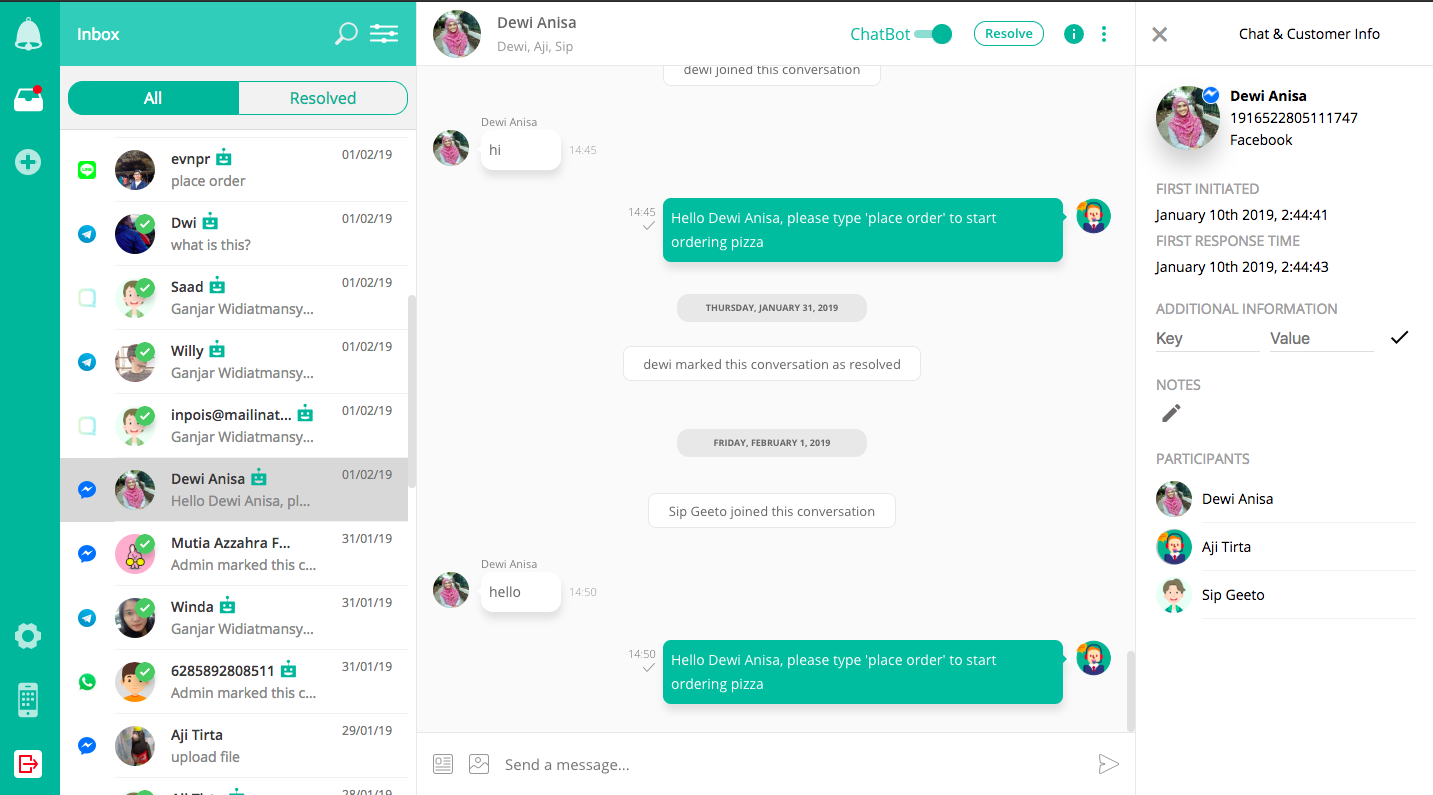
Qiscus Multichannel Customer Service Chat gathers all incoming messages in one place that we call as Inbox. By default, every incoming message will be automatically assigned to an agent. The agent is assigned to a chat based on a special logic. If you are integrated to a bot, you can also activate the bot feature.
There are several features that you can use to improve your conversations.
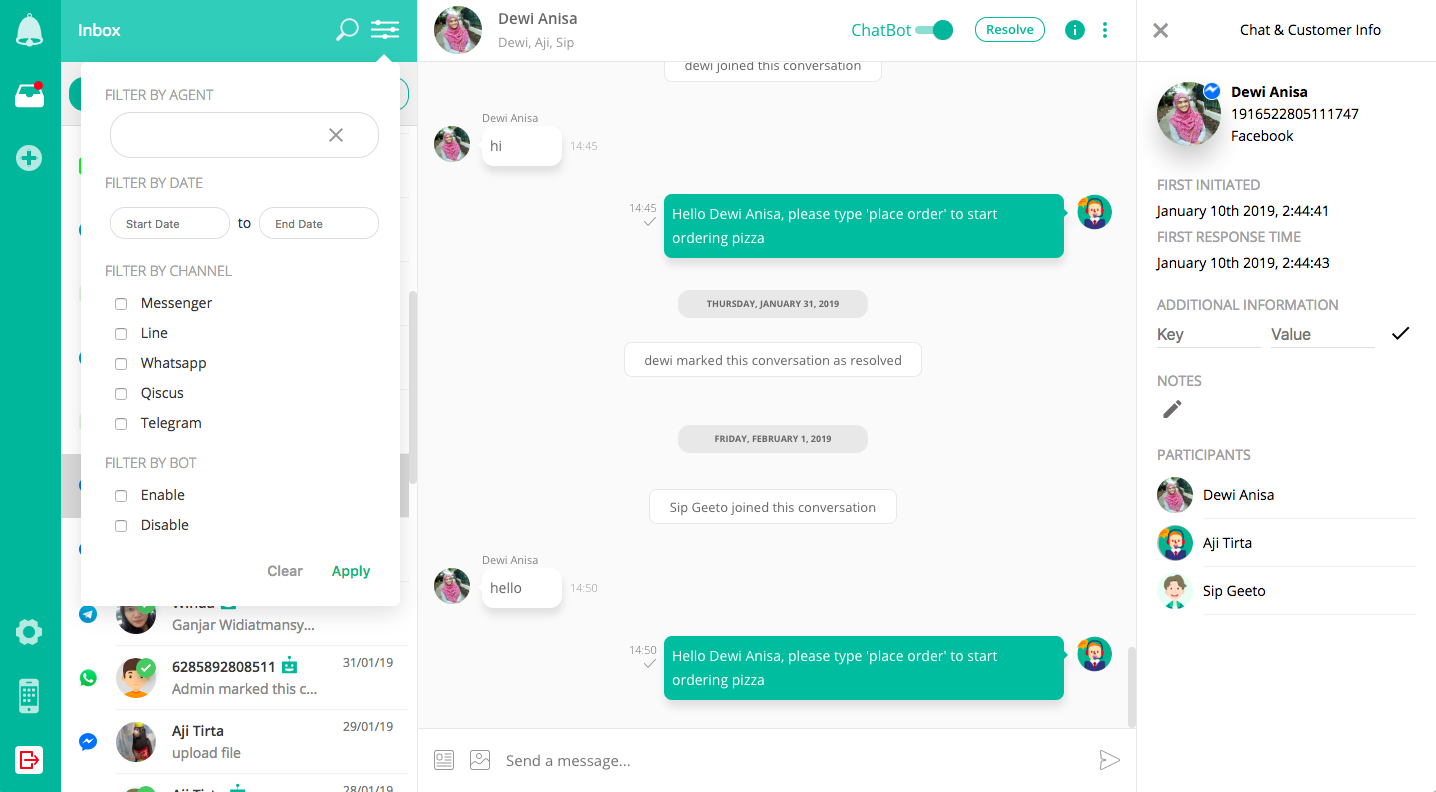
Chat List and Chat Filter
On the left side, we have a chat list that will show all the incoming messages. Every message will have its own channel badge (Facebook Messenger, Line, WhatsApp, Telegram, and Qiscus widget), a check mark for every resolved message, and a bot badge if you activate the bot feature.
If you see the right side of this list, you will find a chat list filter. This feature is very helpful to filter the items so that they are displayed based on their channels, on whether a bot is activated or not, etc. This will be useful when you are dealing with multiple conversations.
Chat Room
Every time you click on a room in the chat list, the chat room will appear on the right side. This is where conversations happen.
The first is the chat panel itself. This is where the conversations are conducted. By default, you can send not only text messages but also files and pictures. On the chat header, you can also find the chatbot toggle button, resolve button, and others that support the agent to function.
The chatbot toggle button will only appear if you have activated the chat bot feature in the integration page. Otherwise, you will not see the button. Every time a feature is activated, by default all incoming messages will be handled automatically by a bot. However, you can also deactivate the bot in that chat room by disabling the chatbot toggle.
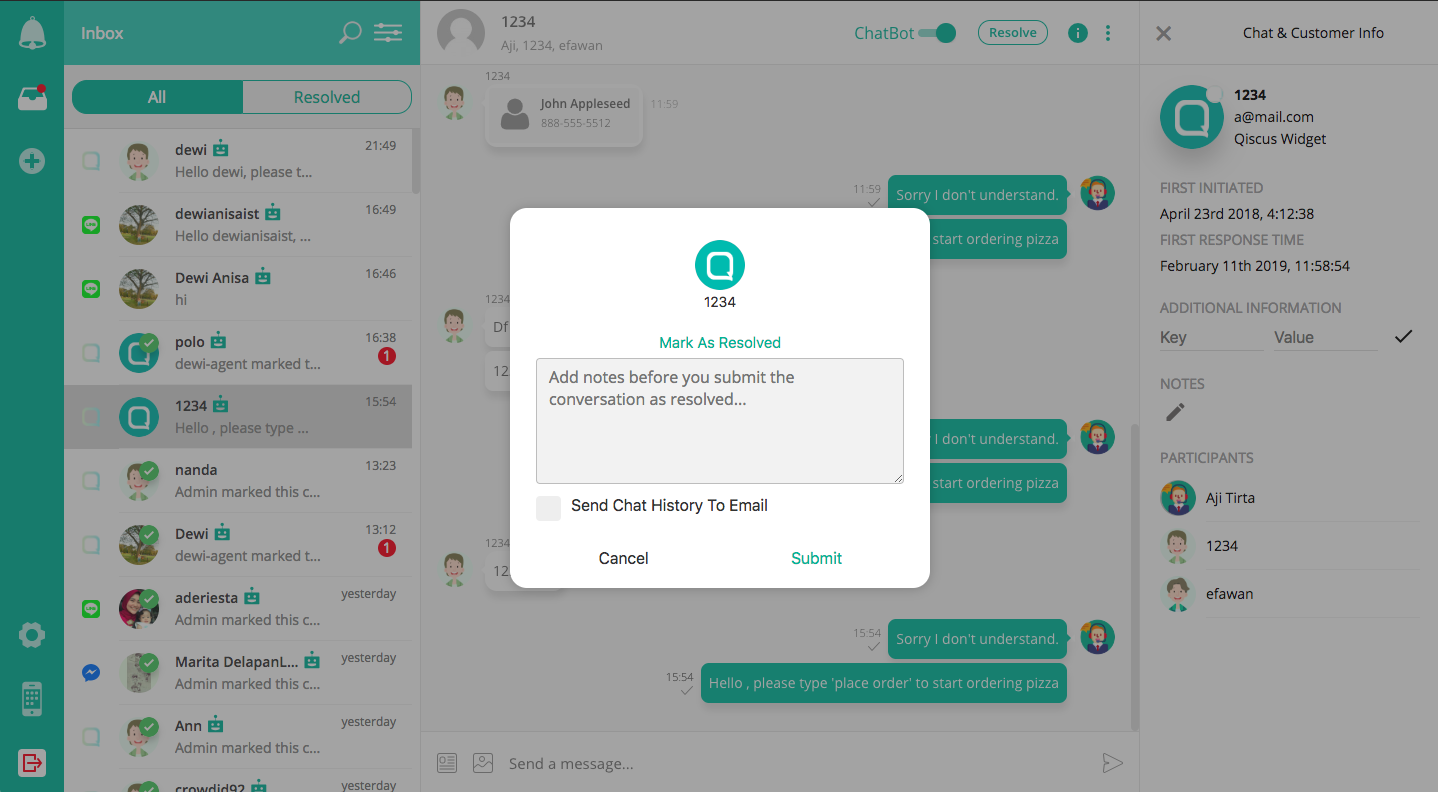
Mark as Resolve Conversation
On the right side of the chatbot toggle button, you can see the Resolve button. This button is used to mark that a conversation has been finished. After you click on this button, a pop-up box will appear. On that pop-up box, you can write down notes about the context of the conversation as your reference. You can also send the conversation’s transcripts to the customer’s email address so that they can have a copy of the conversation notes. Click Submit, and if it’s successful, a check mark will appear in the room list.
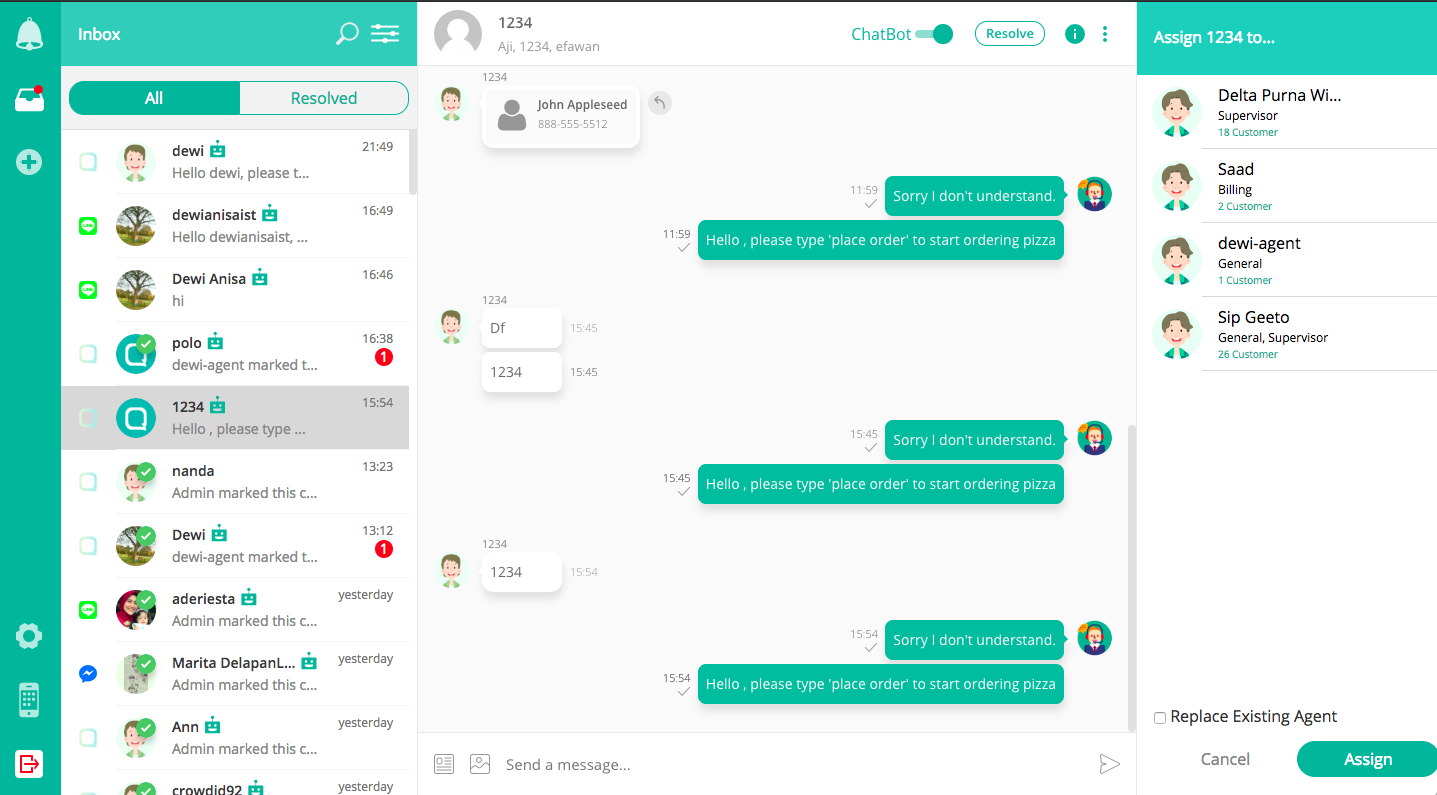
Agents Management
If you’re logged in as an admin, you can add, delete, and replace an agent in a chat room by clicking the more button. This feature is incredibly helpful in distributing workload of answering customers’ questions among your agents. Note that this feature will be different if you are logged in as an agent. Another thing to pay attention to is that you can only add/assign an agent to a chat room when the agent’s status is Online.
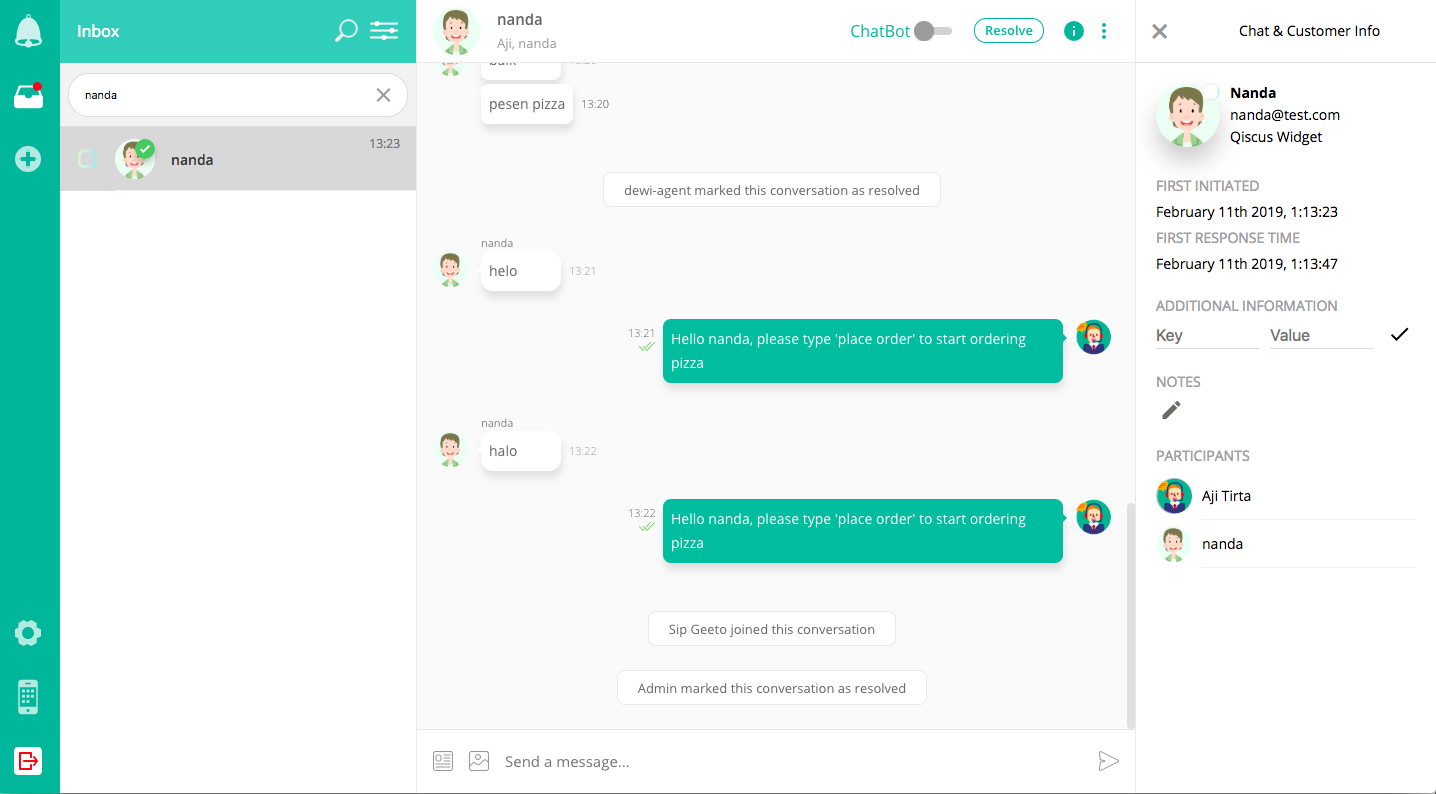
Room Information
On the right side of the chat room, you can see the information about the customer in that conversation. The displayed information is the customer’s name, avatar, email or ID, channel, notes on resolution, etc.
Searching
When more and more of your customers are connected, you can check on the previous customer. However, when you already handle numerous chat rooms, it’s going to be difficult for you to check or search for them one by one. We provide a search feature that will help you to find the chat room that you want in an easier and faster way.
We hope that this tutorial can help you in migrating your service to Qiscus Multichannel Customer Service Chat. If you have any further question, we are happy to help. Please contact our team to [email protected] or put your question here.