WhatsApp Business API gives you the power to elevate your customer service to the next level. As customer experience becomes one of the main factors for customers when purchasing a product or service, the need to elevate your customer service experience undoubtedly becomes more important. Previously, we have introduced you to WhatsApp Business API and why your business should own one. This time, we have prepared a guideline on how to apply for the WhatsApp Business API.
What will you need?
Before getting on the bandwagon of using the WhatsApp Business API, there are a number of things that your business should prepare for. WhatsApp requires businesses to own the following accounts:
Verified Facebook Business Manager account
As stated on the Facebook for Business page, “Business Manager serves as a one-stop shop to manage business tools, business assets and employee access to these assets.” With Business Manager, users can quickly find what they need to work efficiently and complete business tasks with ease. In short, it’s a place for you to manage all of Facebook’s business tools. However, you are required to have a verified Facebook Business Manager account before applying for WhatsApp Business API to provide that your business really exists.
WhatsApp Business account
The WhatsApp business account will allow you to utilize WhatsApp Business API to communicate directly with your customers. This account will later on represent your brand on WhatsApp when customers reach out to you. Your customers will be able to ask questions, enquire on order and payment information and more all via WhatsApp.
What steps should you take?
As of now, you might be thinking that the effort in setting up a WhatsApp Business API for your business may be tedious. However, trust us that with all the benefits it can bring to your business, you will realize that it is actually not that complicated. Allow us to guide you through the process:
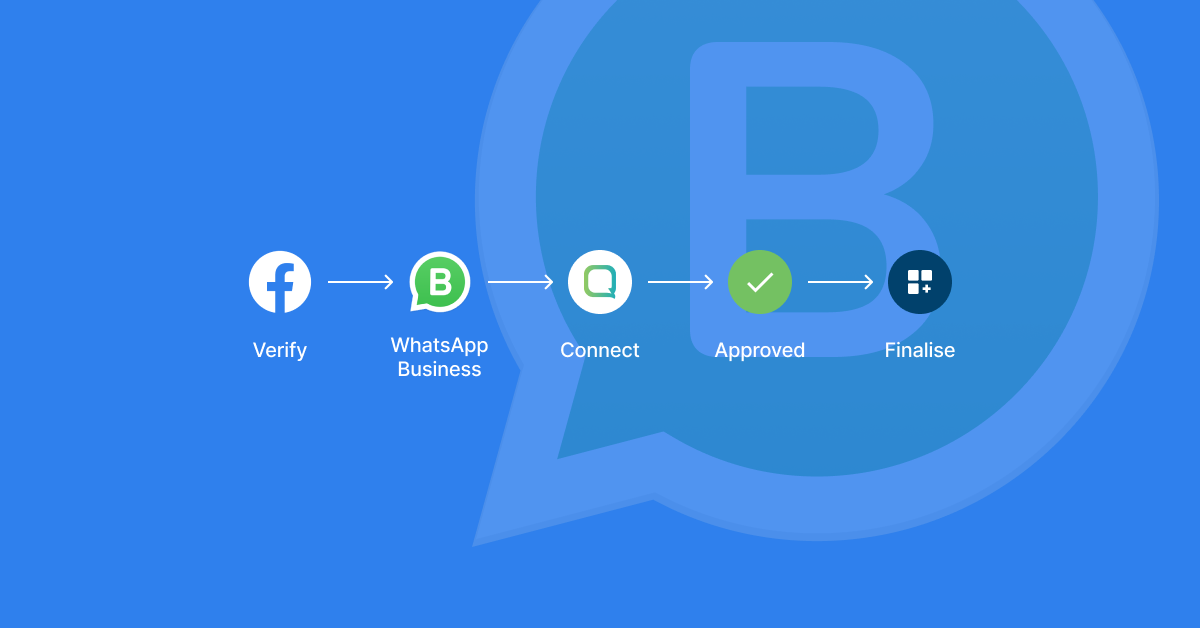
Step 1 – Get your Facebook Business Manager account verified
As an initiative to create a secure and pleasant business environment for everyone, WhatsApp requires businesses to get verified by providing several legal confirmations of the business name and ownership. This is to increase the transparency between businesses and customers. Furthermore, getting your business verified informs WhatsApp and Facebook that your business is legitimate.
To start the verification process, go to the Security Centre and click on “Start Verification” under the Business Verification section. There, you will be asked to fill in details of your business that will be publicly visible such as the category your business belongs to. As soon as the required information is given, you will be able to verify your business with a verification code that is sent to your business phone number via a text message, phone call, or email.
Step 2 – Setup and put your business details on your WhatsApp Business Account
In the second step, you will need to create and set up your WhatsApp Business account. However, before proceeding with this step, you will need to complete your Facebook Business Manager verification process as mentioned in the first step. In filling in the business details, you are required to have approved information that will represent your brand for customers to easily identify your company. To begin, click the business settings in Facebook Business Manager.
Then, under the Accounts section, you will need to select WhatsApp accounts. Furthermore, you will need to fill in several information such as display name, phone number, time zone, local currency, and so on.
Step 3 – Connect a WhatsApp Business API account to your phone number with the help of a WhatsApp BSP
At this point, you will need to partner with a WhatsApp Business Solution Provider (BSP) that will connect your phone number to a WhatsApp Business API account to complete the registration process. To learn more about WhatsApp BSPs, check here. Most WhatsApp BSP would usually ask you to fill in an onboarding form to collect some information that is needed. If all is well, your WhatsApp BSP will help you to create your WhatsApp Business API account and prepare your dashboard.
Step 4 – Approve messaging on behalf of your business and verify your business on WhatsApp
The next step is a continuous process from the previous step. Allowing “Messaging On Behalf” permission would allow your WhatsApp BSP to connect the dashboard with your WhatsApp Business API account which will make sending messages through the dashboard possible. Once you have allowed this, the verification process of your business on WhatsApp is needed. This is a validation process that WhatsApp needs to make sure your business really exists. To complete this process, your business will need to provide all relevant information that are required.
Step 5 – Form the infrastructure of WhatsApp Business API and finalize the dashboard
The final process involves setting up the WhatsApp Business API that has been prepared by your WhatsApp BSP. This includes setting up automatic responses for customers, integration of messaging channels and more. As soon as this process is complete, you will be able to use your dashboard to communicate with your customers right away.
What’s Next?
Qiscus provides businesses with a WhatsApp Business API in the form of the Qiscus Multichannel Chat. With Qiscus, you will have an easier route of getting your business’ very own API. Qiscus will guide and help you through the process from applying, managing, to solving queries of your account. If you have any further questions related to this article or even beyond that, Qiscus can help. Please do not hesitate to talk to us!